APN configurations and cellular networks on Android, IP address and DNS settings on the wifi network and VPN options
 Basically the network settings of the Android smartphone must absolutely not be touched; if everything works well, it doesn't make much sense to get your hands on it and maybe make the situation worse.
However, there may be cases in which we want to maintain control of the network, disable the automatic DHCP settings or manually configure the IP to set addresses, gateways and DNS; for example, in some offices or on some corporate networks it may be necessary to set up a proxy to browse or you may want to try browsing by disguising the IP behind a VPN.
We must also not forget the APNs, which allow our phones to browse the cellular network to which we are connected: if they are not configured or do not work we will never surf the Internet when we are away from home!
In this guide we will show you then how to manage IP addresses, APNs and VPNs on Android, so as to be able to customize the network connection when we are connected to a modem or to a company-type router and to solve any problems connecting to the Internet on the cellular network (which is very common when starting a new phone for the first time).
How to manage IP addresses, APNs and VPNs on Android
In the following chapters we will show you, in a simple way and within everyone's reach (even novice users with a modern phone), how to configure the manual IP address settings, how to configure the APN for any mobile operator available in Italy and how to set up a VPN connection.
Configure manual IP address
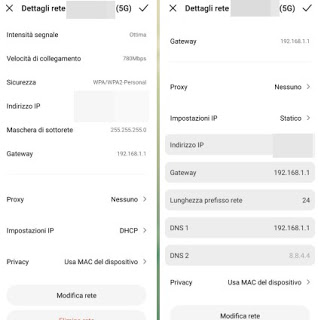
If we want to set the manual IP address on Wi-Fi on any Android smartphone or tablet (including Samsung Galaxy, Xiaomi or Huawei), open the app Settings, we press on Wifi, tap on the name of the network to which we are already connected (or press on the arrow symbol next to the network name), scroll to the end of the page and press on IP settings or Advanced settings (depending on the model in use).
Tapping on the writing DHCP you can select the item Static IP and unlock the items to set the IP address manually according to your configuration.
Static IP, gateway (i.e. router address) and then also primary and secondary DNS can be changed in this screen and have value for all apps and processes that use the internet connection with that specific Wi-Fi network; obviously we will have to repeat the steps for each Wi-Fi network to which we connect, since the changes are not global. With this method you can set the Google DNS or any other DNS server, as seen in our guide How to change DNS on Android and iPhone.
Configure APN for cellular data network
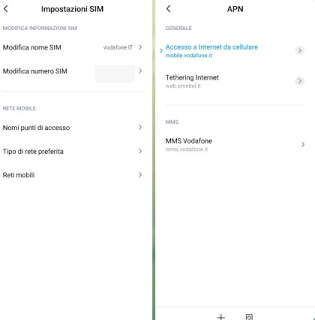
The settings of the cellular data network (with LTE technology but also for others types of technologies) can be changed by bringing us into the app Settings, pressing on SIM cards and mobile networks (or similar names), selecting the SIM we are using for the data connection and finally pressing on Access point names or APN.
The names and settings of the access points should be automatically configured by the operator with whom the SIM card was bought, usually when the phone is first started or immediately after inserting the new SIM into the Android smartphone (we will receive an SMS or a link APN configuration web).
If you want manually change or add the APN we have to delete any already present ones (in particular if we have changed operator), press the key Add APN or New APN and set, under the field APN, one of the following access addresses:
- TIM: ibox.tim.it
- Vodafone: mobile.vodafone.it
- Wind Tre: internet.it
- Fastweb: apn.fastweb.it
- Iliad: iliad
- PosteMobile: wap.postemobile.it
- I have. Mobile: web.ho-mobile.it
- Kena: web.kenamobile.it
Enter a name of your choice, confirm the changes and, returning to the previous screen, make sure to press on the new APN just configured to activate it. Now all that remains is to activate the data connection or activate / deactivate the airplane mode of the phone, so you can immediately start surfing.
To learn more about the APN configuration, we suggest you read our guide How to set the APNs of TIM, Vodafone, WindTRE, Iliad and other operators.
If, on the other hand, we want to get a better signal and reception, let's continue reading our article Optimize 3G (UMTS) and 4G (LTE) signal and data reception on Android.
Set up VPN on Android
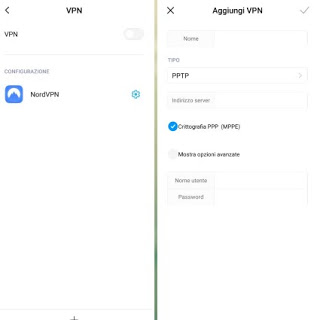
On Android it is possible to manually add a VPN network to disguise and hide the connection IP or to connect to a corporate network. To set up a VPN we open the app Settings, let's open the menu VPN or look for it as a selectable item in some other menu (usually Connection and sharing or Other).
In the menu that will open, click on Add VPN and configure the parameters in our possession; at the end we confirm and activate the connection by pressing the switch at the top, next to the item VPN.
To learn more, we recommend that you read our guides immediately Best VPNs for Android, free and unlimited iPhones is Fastest, most reliable and limitless premium VPNs.
Conclusions
By carefully following the advice set out in the previous chapters, we will be able to effectively change the IP address and other connection parameters of our Android smartphone or tablet; we have also seen how to manually configure the APN for the connection on the cellular network and how to add the VPNs, by entering the parameters provided by our network administrator or by the VPN service chosen for anonymity (in the latter case it may be sufficient to install the dedicated app to immediately obtain all the necessary parameters).
If our Android smartphone does not connect to the Internet, we invite you to read our guide as well Solutions if Wi-Fi on Android does not connect to the network or internet.
Still on the same topic, we suggest you read the guides Reset network settings on Android and iPhone is Optimize connection on Android, iPhone by combining WiFi and data, so that we can restore or enhance the Internet connection of our phone in a simple and immediate way.


