 When a Windows PC has errors or malfunctions (often without a real cause) we can fix it quickly creating a restore point at regular intervals, so you can always restore Windows to a date where it was known to work. Unfortunately, on the latest versions of Windows, restore points are a bit snubbed and must be activated in order to use them correctly.
In the guide that follows we will show you how to create restore points on windows 10 and windows 11, using the menus and settings found on Microsoft operating systems. For those who want to better manage the restore points there are also dedicated programs to be installed on the PC.
READ ALSO -> Enable system restore points in Windows 10
Activate restore points
As mentioned in the preview we must first activate the restore points on Windows 10 and Windows 11 and only then create our personal restore points (in addition to those that the system will generate automatically).
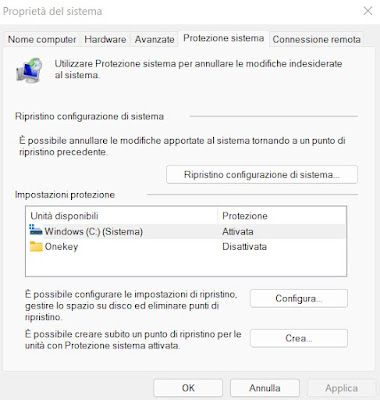
Per activate restore points on Windows 11 we press on the Start menu, we type Restore point on the computer keyboard and press on the voice Create a restore point. In the new window that opens, press on the main disk (labeled as System The C:), click on Configure and we check the item Turn on system protection. On the same screen we can choose when to reserve disk space for recovery points: we always recommend leaving at least 10 GB for recovery points, so as to have more choice during recovery.
Per activate restore points on Windows 10 we open File Explorer (from the Start menu), right-click on This PC, select the item at the top right System protection, we select the main disk of the computer (with the inscription System), press the key Configure and we activate the voice Turn on system protection. Also in this window you can choose when to reserve space for protection through recovery points.
Create manual restore points
After activation, restore points will be created automatically by the system when we install updates, when we install new programs or drivers and in other “sensitive” situations. To create a manual restore point we can go to the same windows seen in the previous chapter and press the button Create, in order to open the restore point configuration window.
A small window will open where we have to choose the name to give to the restore point, so that we can easily identify it. For convenience, we recommend that you use the day, month and year within the name, so that you can immediately identify it in case of a reset.
How to use restore points
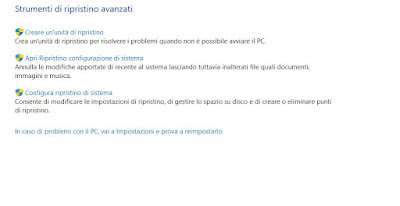
If the computer does not work well but we can at least access the desktop and the basic functions of the operating system, we can immediately use the restore point (before it’s too late) by opening the Start menu, typing Restoration on the keyboard and clicking on the item Restoration. In the screen that opens, click on Open System Restore, select the restore point to use and follow the guided steps to restart the PC and make it go “back in time”.
If the computer no longer starts or freezes at startup, just force it to restart 3 times in a row, so as to start the Windows recovery console. Once the recovery console is open, press on Advanced options, then on Troubleshooting -> Advanced options and click on the item System Restore to choose which restore point to use.
On the Windows recovery console we can also read our guides on how to open windows recovery console and how reinstall the Windows 10 recovery console (Windows RE).
Programs to manage restore points
In addition to the integrated tools, we can create and manage recovery points with third-party programs, designed to provide a comfortable graphical interface for novice users with Windows recovery tools. Below we will show you the best programs to manage restore points however, they can be a little simpler.
1) Restore Point Creator it allows you to easily create new restore points and displays a complete list of those already created and present on your system. There is a version to install and a portable version, useful for using the program on any occasion. The program requires the .NET Framework 4.0 and it also works on Windows 10 and Windows 11.
2) Single Click Restore Point it’s little tool that automatically creates a new restore point with a simple click. This way you can create quickly and manually a point on the system to which you can return in case you are about to carry out installations of dubious safety or delicate modifications. It supports creating a desktop icon, so you can double-click to create restore points right away.
3) Reboot Restore RX is a great assistant program to manage system restore points, choosing when to create them and how to restore them. You can use this simple software to ask for a reset when your computer restarts.
Conclusions
Restore points remain the first tool for many users troubleshoot Windows, as they are easy to create and restore (even if the system fails to boot). It is still not clear why Microsoft deactivates them by default, given that it is still a very effective security system to restore Windows immediately without having to use other backup tools.
Still on the subject of Windows backup and recovery, we recommend that you read our guides on how to restore Windows with fresh installation without losing personal data and if windows 10 or 11 won’t boot, how to save everything and reinstall.
If instead we want to use the recovery discs we can read our article on ways to repair Windows 10 and create recovery disk.


