 When we carry out theupgrade to Windows 10 from a previous version or even if we install Windows 11 from Windows 10 or even when we reinstall Windows using the reset and recovery options, in all cases where the disk does not format completely, even if you get a new and clean system, we can always recover all personal files of the previous installation using a special folder called Windows.old.
This special folder is very important because it is convenient for the files present in the old Windows installation, so that you can restore them to the new system. Those who have already recovered the files can choose to delete it, so as to recover the space occupied.
In the guide that follows we will show you how to successfully recover files from windows.old folder and, subsequently, how to delete this folder following the procedure provided by Microsoft, in order to recover the occupied space.
READ ALSO -> How to restore Windows with fresh installation without losing personal data
How to find the Windows.old folder
Anyone who has just updated or formatted without erasing the drive can find and open the folder C:/Windows.old, which contains the entire Windows file system as it was before the upgrade or after a reinstall or restore. Personal files, documents, music, photos and desktop are all included in the path Windows.old\Users\%Username% and can be managed normally or moved, by copying and pasting in the current profile folder, in C:/Users.
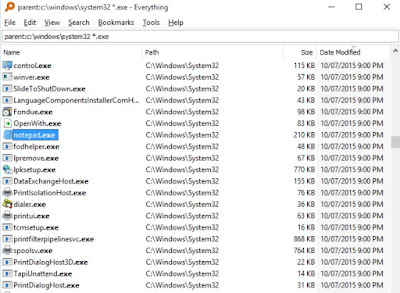
If we have difficulty finding this folder (perhaps because it is hidden) we can always get help from a program like Everything, a real all-rounder finder to be installed on any PC with a Windows operating system.

To restore the files contained in this folder, open one of the internal folders inside, select all the files and folders contained therein, press the Shift key on the keyboard and right-click on the selection, so that you can use the “Send to” option and choose where to move them. Alternatively, we choose the option Copy in the right-click menu and go to the corresponding folder in the user profile, press the right button again in the destination folder and choose the option Paste.
We remind you that on Windows 11 the keys Copy e Paste they are stylized as icons at the top of the right-click menu; those who wish can restore the old right-click menu by following our guide on how return with the classic right-click menu in Windows 11.
Delete the Windows.old folder
After recovering the files of our interest, the Windows.old folder is frankly useless, unless you decide to go back after an update. We therefore recommend that you always wait 30 days after an update that involves a change of version, so as to be sure not to run into any problems.
After 30 days we can recover disk space, it is possible to delete the Windows.old folder using the procedure provided by Microsoft; we avoid deleting it manually, since it is locked at the System level, ie we do not have enough permissions to delete it as if it were a normal folder.
To delete the Windows.old folder we open the menu Settings and look for the item in the search field above Activate the memory sensoravailable on both Windows 10 and Windows 11.
In the window that opens, scroll down until you find the button Run Storage Sense nowwe wait for the end of the scan then we use the option for delete previous versions of Windows.
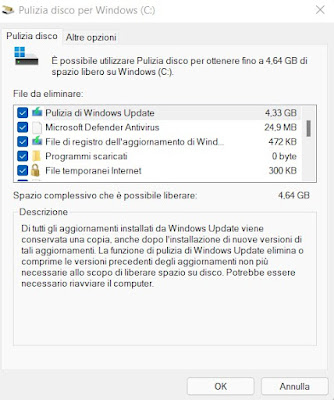
Alternatively we can use the old tool of Disk Cleanup, which allows you to delete the Windows.old folder just as effectively. To use this cleaning tool we open the Start menu on Windows 11 or Windows 10, we look for the app Cleaning disk and let’s open it. In the window that opens, select the disk to be scanned and click on in the next window System File Cleanuppresent at the bottom left.

Those who want to learn more can also read our guide on how delete the Windows.old folder in Windows.
Alternatives to the Windows.old folder
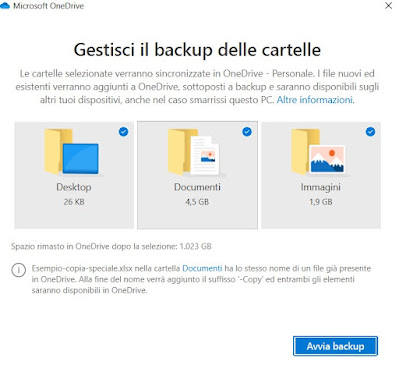
Instead of relying on the Windows.old folder to store our personal files, it’s better to set up OneDrive backup on Windows 10 and Windows 11, so we can restore all the files we need on the fly.
On Windows 11 we can start the backup of personal files by opening the app Settingspressing on the Account menu, selecting the menu Backup Windows and finally pressing on Configure synchronization.

On Windows 10 we can backup your personal files by taking us to the app Settingsopening the menu Update and securityby clicking on the Backup menu and pressing at the top on Sign in to OneDrive. From the menu that will open, log in to OneDrive with a Microsoft account, select the folders to save online and confirm where necessary to make the changes effective.
To know other effective backup tools on Windows we can also read our article Enable Windows 10 and 11 Automatic Backup.
Conclusions
The Windows.old folder has been present in Windows installations for decades but, just like in the 90s, it performs its function in a great way: it allows you to recover the files present in the previous Windows installation or to restore personal files after an update , so you don’t miss any important documents.
If we have deleted the Windows.old folder by mistake and have not recovered the files inside it, we advise you to immediately follow the procedures described in our guides. recover accidentally deleted files with Windows File Recovery come on how to recover deleted files on PC from hard drive or SSD.
