 If while using the PC for work or study, program loading errors occur, if suddenly Windows no longer responds to any keyboard or mouse commands or we see the blue screen of the fatal error appear in many cases the problem is caused by an internal disk error. This error can be both of hardware origin (and therefore we are at risk of total disk failure) and software, since it is often Windows itself that generates errors within the file system.
When a disk failure is suspected, Windows makes one available internal tool called Chkdskbetter known as Scan Disk or Check Disk. The Check Disk is not only a tool that checks the entire hard drive to find and fix any errors, but it can really help prevent bigger problems and, above all, avoid data loss.
Let’s see together how to fix disk errors with Scan Disk on Windows 11 and Windows 10, in order to have received feedback on the extent of the damage and to solve it brilliantly (if of software origin). If the problem is caused by an imminent hardware failure, even Scan Disk can do very little: in this case it is worthwhile save important files as soon as possible.
READ ALSO -> Recognize if the SSD is breaking and if it needs to be changed
1) How Scan Disk works
The Scan Disk can be used in two ways:
- For scanning the integrity of the file systemfile system metadata, a volume’s master file table (MFT), security descriptors associated with files, or the alignment of date and time or even file size on individual files.
- The Chkdsk can also optionally, check each sector of the disk looking for sectors with badly written data or hardware corruption of the disk.
In the latter case, the Scan Disk attempts to solve these problems by repairing the bad sectors and marking the bad ones so that they are no longer reused by the system and programs. Although, described in words, it seems like something very technical only for experts, in reality Windows makes it really easy to use the Scan Disk.
How to start disk error checker from GUI
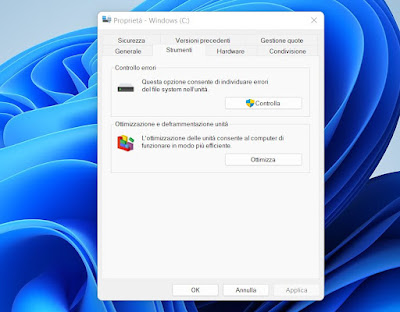
To check a disk from Windows 11 and Windows 10we open the Start menu, we look for the program File Explorer and select the shortcut on the side This PC. In the new screen we press the right mouse button on the disk we want to check, press on Propertywe open the tab Instruments and then click the button Check it out present in the section Error checking.

It should be noted that the control through the graphical interface does not correct problems, it is only a quick check necessary to detect errors; if there are errors Windows will give instructions on how to proceed and the computer will restart.
How to start disk error checker from command prompt
Windows disk error checking is based on the Chkdsk tool which can also be run from the command line by adding many more options. You may need to use Command Prompt because Windows does not start properly or to force auto-fix and scan for bad sectors in Windows 10 and 11.
To open the Command Prompt we press on the Start menu, we type cmd on the keyboard, press the right mouse button on the app Command Prompt and we choose the voice Run as administrator. In the window that opens we can start the Scan Disk in prompt mode, much more effective and powerful.
Below we have collected the main commands for the Scan Disk, to be written on the prompt and to be executed by pressing Enter.
- chkntfs c: -> check the status of the disk scan, if it was required and if it was scheduled (letter c: is the disk letter which can also be different).
- chkdsk /f c: -> is used to ask to check and also correct disk errors (if the disk is in use, the scan will take place at the next reboot and confirmation is requested).
- chkdsk /r c: -> allows you to start scanning for bad sectors.
- chkdsk /r /f c: -> this command scans with error checking and correction plus checking for bad sectors.
- chkntfs /x c: -> this command is used to cancel a scheduled scandisk
We launch one of the commands seen above to scan the disk and solve the errors inside it.
Third party programs to scan disk
In addition to the Scan Disk command present within Windows we can check the integrity of the disk in use with some third-party programs. These programs run scandisk very similar to the one found on Windows e they are very useful when Windows no longer works or when the Scan Disk command prompt fails to repair. The best programs to scan the disk are:
1) SeaTools is one of the best programs to scan and repair disks full of read or write errors. This tool is specific to Seagate drives, but can also be used to repair errors on other hard drive models or SSDs. It can be downloaded in Portable version and in boot CD version (to repair discs without starting Windows).
2) CheckDisk is a program that allows you to scan disk, search for bad sectors and repair errors using the chkdsk de prompt utility, adding a convenient graphical interface. This simple utility portablewhich requires no installation, absolutely free, offers simplicity and efficiency in doing the check for bad sectors, errors or other anomalies and to repair the hard disk.
3) HDDScan is a program to check errors on the hard disk that has a few more options than the normal Scan Disk. With it we can both check the information provided by the disk itself and start a thorough test on bad sectors and file system errors, so as to fix them quickly.
4) CheckDrive, a recent program that allows you to check for disk errors and that also offers diagnostic data such as the rotation speed and health of the drive, hard disk or SSD. It can also be left running in the background to warn you of any write or read errors. The program can be downloaded by pressing the free download button.
5) WinDFT (HGST Drive Fitness Test) is another valid program to scan the health of the hard disk or SSD in use, so you can evaluate its real performance and find out if there are errors that can be repaired via Scan Disk or if the case should immediately replace the hard disk before its definitive break.
Conclusions
The check I say of chkdsk should be performed every time the PC freezes for no reason, every time Windows shuts down abnormally (for example by turning it off suddenly or when the electricity goes out), every time the blue screen appears and also in case of problems with programs that do not load or crash the system.
In case of bad sectors the data present in those specific sectors could be lost forever. For this reason, you should always have a backup of your important files.
In another article we saw how to make a checking the hard disk, health and performance of the disks. If, on the other hand, we need to replace the disk, we recommend that you read our guide to best SSD disks for PCs for faster loads.
