 In order to better manage an Apple device, we inevitably have to install iTunes on our PC, otherwise, we won’t have access to some backup and restore options, not counting the management of multimedia files and contacts.
iTunes, therefore, becomes essential because it is the iPhone management program from the PC and allows access to the iTunes Store, where we can find online music, movies, and apps.
iTunes, however, is a huge and complex program to understand, it allows you to do many things and, for this reason, it is complicated to use when you first start.
In this guide we will show you all the tricks and tips to be able to better manage our iPhone from your computer via iTunes, so you don’t have any more difficulties every time you connect an Apple device to your PC.READ ALSO -> Programs to manage iPhone from PC without iTunes
First of all, as already written in another post, iTunes for PC is a great music player, similar to Windows Media Player, perfect for listening to songs and managing computer music.
But we can do many more things, especially if we connect an iPhone and intend to manage it via iTunes (in many cases there are features only accessible with this program).
1) How to sync and manage iPhone
One of the most useful functions of iTunes is the function of synchronization with the iPhone, which allows you to synchronize every data and every multimedia file present in your account, so as to always be available.
To manage the iPhone with iTunes, simply open the program and connect the phone via USB cable to the PC.
The device will become visible in the sidebar; as soon as it is connected, click on the small iPhone symbol in the top bar to access the advanced settings offered by iTunes for the device.
From this screen we can manually synchronize the iPhone by clicking on the button Synchronize present at the bottom of iTunes.
If we want to make the synchronization automatic every time the Apple device is connected, we scroll down so that we can find and activate the voice Sync automatically when the iPhone is connected.
If we want synchronization to take place without a USB cable but via WiFi, simply activate the voice Synchronize with iPhone via WiFi.
If we don’t want iTunes to do everything automatically and we want to personally manage the music and videos to be added to the iPhone, we disable the previously activated items and activate only Manually manage music and videos.
From now on we will be able to add only the multimedia files that we want simply by dragging them from the iTunes interface to the iPhone device in the sidebar.
2) How to make and restore iPhone backups
To make a backup of the iPhone to be stored on the PC or synchronized with iCloud, simply connect the device to the PC with iTunes installed, open the program and click on the small phone-shaped button at the top.
Now just click on Backup now to start the backup execution.
We can also choose where to save this backup by selecting the item This computer or iCloud; to protect the backup, we can also start encryption by checking the box Encode iPhone backup.
If we intend to restore a previous backup saved on the PC via iTunes, we will only have to connect the device via USB, go to the same menu seen a little while ago and click this time on Restore backup.
3) How to update and restore iPhone
Do we want to check for updates or do we want to restore an iPhone to factory settings?
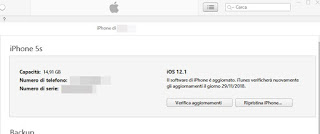
We can do everything from iTunes by opening the program, connecting the iPhone via USB cable to the computer and taking us back to the menu Settings (by clicking on the phone icon in the upper part of the interface).
Once the window is open, click on Check for updates to start searching for new updates for the iOS operating system.
If there are updates, iTunes will report it and proceed with the download and installation on the iPhone; updates are checked automatically, simply connect the phone periodically to perform this type of check.
If we intend to restore the iPhone to the original settings (to sell it or to sell it to other people for example) just use the button Reset iPhone present next to the button that allows you to search for updates.
Recovery is also useful if the iPhone has problems and we want to try to solve them by following this path.
4) Associate new local music (MP3 files and the like)
Do we have folders full of music files and we want to add them to iTunes and iPhone?
To add local music, simply open the program and click File -> Add folder to the library or Add files to the library.
We select the folder or files to add, so we wait for the loading and synchronization with the iPhone.
If we have manual synchronization or manual file management, to move the music just drag the songs from the right side of the interface to the iPhone, present in the left bar.
5) How to convert music
The files we own locally are in excellent quality (WAV or FLAC) and we want to convert them into a format easily manageable from the iPhone, without taking up too much space?
In this case, simply connect the iPhone to the PC via USB cable, open the menu Settings (top iPhone icon), scroll through the options and activate the item Convert songs with a higher bit rate to 192 kbps AAC.
As soon as we drag songs from iTunes to the iPhone the conversion will be done automatically in the AAC format, much more compatible and of higher quality than the simple MP3 (with the same bitrate).
If we want to convert all the music library into AAC, just click on top on File and use the menu Convert to carry out the most congenial type of conversion.
8) Other useful guides for iTunes
iTunes tends to create a lot of duplicates that fill the hard disk if in each folder there are the same songs.
The duplicates on iTunes are also the consequence of badly synchronized syncs and the song collection ends up ruining itself with non-existent or double tracks.
In this case, we recommend using an external program to remove duplicate mp3s and clean up iTunes with non-existent tracks.
With iTunes, it is also possible to synchronize music on multiple computers.
To do this, simply open the menu iTunes> Edit> Preferences and go to the card Sharing, so you can activate the service and choose what to share on the local network.
This feature uses Bonjour, the service that also serves to listen to the music of a PC, on another computer on the network (to be enabled in the tab devices)
Sharing can be set for up to 5 PCs on the network so all home computers can hear the same music.
In another article, we talked about how to copy the iTunes library and move it to other PCs, manually.
The iTunes Genius function can be activated from the Store menu and allows you to find music similar to the one you are listening to; however the listening in the streaming of the found pieces is strongly limited, in fact, it can be done only for 30 seconds.
If you like the idea but want to take full advantage of this feature in another article we have seen MusicBee Player better than iTunes, with AutoDJ and Genius function.
As written in detail in another guide, with iTunes you can create a personal mp3 ringtone for the iPhone.
In another article we talked about programs to upload music and videos to iPhone from the PC, they are often lighter and faster than iTunesma that do not have the functionality to backup, restore and convert.
READ ALSO: Synchronize iTunes with Android to transfer music from PC to mobile

