There are so many ways to block unauthorized access to your computer and on Windows 11 as well as on Windows 10 there is the BitLocker tool, a security feature that allows you to use encryption on an internal or external drive to protect your data from unauthorized access to documents, images and any files on your computer.
Therefore, not only can the data in a USB stick be protected if it is lost or stolen, but it is also possible to make the computer disk unreadable and make sure that its data cannot be accessed even if the PC is stolen and the disk disassembled. .
When you enable encryption on the drive, all data is encrypted using the Advanced Encryption Standard (AES) encryption algorithm to encrypt data across the entire drive and no one can access it without the correct password.
BitLocker is available on Windows 11 Pro, Enterprise and Education, not present on the Home edition (same for Windows 10). Bitlocker can be used to encrypt and protect the operating system, fixed data drives and also, via the BitLocker To Go tool, to encrypt removable drives (such as external hard drives or USB sticks).
READ ALSO: Encrypt the PC disk and Windows startup with Veracrypt
BitLocker, to work at its best, requires a Trusted Platform Module (TPM) chip which is one of the requirements of Windows 11, on which therefore it is not necessary to do checks. In Windows 10 you can activate BitLocker with TPM or by using software encryption, although additional steps are required for authentication (see at the end).
In this guide, we see the steps to enable and disable BitLocker on Windows 11, to protect entire data disks and removable USB storage.
Attivare Bitlocker sul PC
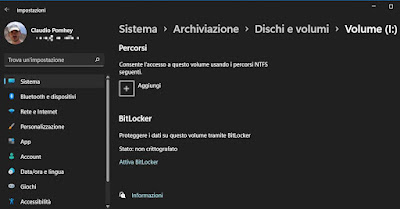
To enable BitLocker on a Windows 11 or Windows 10 hard drive, open Settings and go to the System> Storage section.
In the “Storage Management” section, click Advanced Storage Settings and go to Disks and Volumes.
From the list of disks and partitions, select the drive you want to encrypt and then go to Properties to finally find the Bitlocker option at the bottom.
Then click on Activate BitLocker and open the Bitlocker encryption configuration window. Here select again the right disk that you want to protect eg press the Activate Bitlocker link.
This window is the same in both Windows 10 and Windows 11 and can also be reached from the Control Panel, in the Security and Maintenance section.
After loading, you will be able to write the password which will be used to access the data on that disk. In the next step you can also choose to save the password in your Microsoft account or in a file or even print it so you don’t lose it.
If you save the password on the Microsoft account, you will be able to recover the Bitlocker password from this Microsoft account web page.
Going forward, you can choose whether to encrypt only the space occupied by data or the entire disk.
In Windows 11, going forward again, you can choose the new encryption mode, to use if you are encrypting the system disk drive, or the compatible mode, to use if you plan to move the protected drive to another PC with another version of Windows to use if you are protecting a USB stick or external drive).
If you are encrypting your system disk you will eventually also be able to activate an option to run the Bitlocker system check, which is recommended.
In case you are encrypting a removable drive, such as a USB stick or an external disk, the procedure is identical and the stick will be protected with Bitlocker To Go, so you can decrypt it on any computer.
The procedure ends here and it will be possible to activate Bitlocker to protect the hard drive and all the data inside it. The computer will restart to enable BitLocker and depending on the amount of data available on the drive, BitLocker will continue to encrypt the used space working in the background.
Disabilitare Bitlocker
Per disabilitare BitLocker su qualsiasi unità, aprire la funzione Crittografia Bitlocker aprendo il Pannello di Controllo, alla sezione Sistema e sicurezza.
Selezionare quindi l’unità protetta da disabilitare e premere sull’opzione Disattiva BitLocker che richiederà di scrivere la password di sblocco.
Dopo aver completato i passaggi, Windows 11 o Windows 10 inizierà a decrittografare l’unità e bisognerà attendere un periodo di tempo più o meno lungo a seconda della quantità di dati.
Final Notes
In some cases, on Windows 10 PCs (or even Windows 7 and Windows 8.1), pressing Activate Bitlocker, an error message may appear warning that a TPM (Trusted Platform Module) security device is not available on the computer. The TPM is present on all PCs produced in recent years, but may be absent on older computers.
To activate Bitlocker without TPM then you have to go to Start -> Run and type the command gpedit.msc.
From the Local Group Policy window that opens, you must follow the following path: Computer Configuration -> Administrative Templates -> Windows Components -> Bitlocker Drive Encryption -> Operating System Drives.
Then click on the item Request additional authentication at startup and enable it. Below at the bottom you should notice the check mark on the item “Allow Bitlocker without a compatible TPM“, if not, put the flag. Finally, click on Apply and then OK.
At this point it is possible to protect and encrypt, with the same procedure above, both the hard disk and the USB sticks, external drives and memory cards.
READ ALSO: Password protect files and folders on Windows
