 Backing up a Windows system may seem a complicated, long and tedious operation, but it is vital to be able to recover personal data and make the PC work again without having to restore or reformat the disk every time!
With a Windows backup, we will get a precise image of the entire Windows operating system including all personal folder data, all installed programs, all configurations made, all registry keys so that once loaded and all of the licenses purchased for paid programs.
In this guide, we will show you how to backup and restore your computer using a free and easy-to-use program like Macrium Reflect.
READ ALSO: Factory reset on PCs and laptops
How to backup and restore your computer
By carefully following all the steps described in the following chapters, we will be able to make simple and immediate backups, to be restored in case of problems with the operating system, in the event of a disk crash or in the case of heavy infection (such as ransomware).
Preliminary operations
Before starting with the backup and with Macrium Reflect, we will need to provide ourselves with a “container” to safely store our backups. This container must be external to the operating system, so as not to be affected by any failures or infections in progress on the main machine; for the purpose, we can use external USB hard disks, like for example the Western Digital Elements Portable Hard Disk of 2 TB (69 €).
We connect the disk to our computer using a USB 3.0 port (we don’t use USB 2.0 ports, too slow) e let’s format it in NTFS, so as to be able to host the large backup files generated by Macrium Reflect.
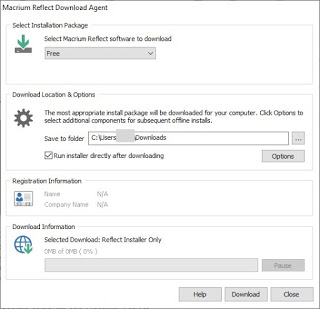
After preparing the disc, download our free copy of Macrium Reflect from the official website by clicking Home Use and starting the downloaded installer, which will take care of recovering the actual program and installing it on our computer.
After the download the real Macrium Reflect installer will start, in which we will only have to confirm the licensed Home when requested (so as to benefit from the free version without limits).
How to make a complete backup with Macrium Reflect
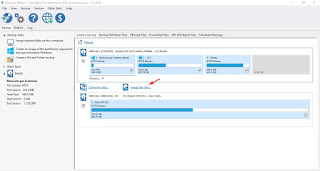
With the disk inserted in the computer, we open the Macrium Reflect program looking for it from the Start menu, we check the presence of both disks in the interface (the system disk and the external disk), so we click on the item Image this disk, present just below the system disk.
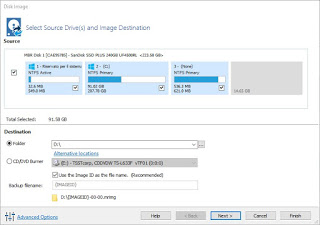
A new window will open, in which we will have to select all the partitions on the disk, choose the USB hard drive as the destination (in the field Folder) and finally click on Next.
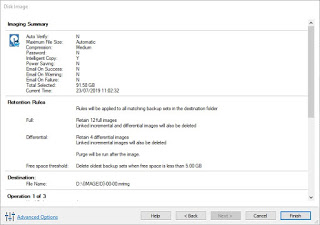
A new window will now open where you can choose whether to perform an automatic backup at regular intervals; we can safely ignore this guide and click again Next. In the last window that appears we will find the summary of the backup we have created; to start it, just click Finish.
The program will start to generate an image file of the entire system disk: the process could take several hours, so we advise you not to touch the PC for any reason (so as to speed up the process as much as possible).
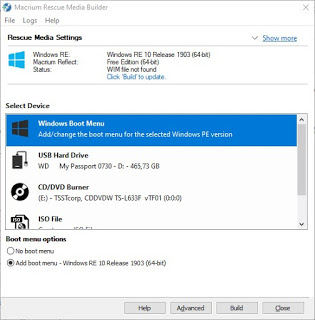
After creating the system image, we click above on Other Tasks and select Create Rescue Media.
We have several methods to create the partition or recovery disk, to be used to restore the newly created system image. For maximum security we advise you to insert a blank CD or DVD inside the burner and use the voice CD / DVD Burner to be able to create the recovery disk; alternatively, we can insert a USB stick suitable for the purpose (2 GB is enough) and using the voice USB Hard Drive.
The program allows you to add a recovery environment directly inside the system disk: in this way, at every startup, we can choose whether to start Windows normally or start the recovery environment of Macrium Reflect (based on Windows PE), so to be able to quickly restore a backup in case of blockages or problems (this method is particularly effective on laptops). To this option, we always recommend combining the creation of the boot medium (CD or USB): in the unfortunate hypothesis in which the hard disk should break completely we can restore the image on the new disk.
How to restore the backup with Macrium Reflect
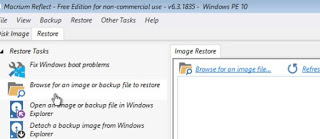
Restoring the system image is really very simple: we start the CD or the USB key with the recovery environment (modifying theboot order) or by choosing the recovery environment at computer startup (if we have chosen to add the dedicated partition), we connect the external USB disk to the computer so in the Macrium Reflect interface provided in the recovery environment we click on Browse for an image or backup to restore, selecting the image stored in the external disk.
After selecting the image, it will appear below the system disk, in the right part of the interface: to start the restore procedure we will only have to click on the item Restore image present among the items available next to the image.
The program will start the restore sequence, reporting the operating system at the exact moment the image was created. In the end, we will have to do nothing but restart and check that the restored system starts correctly; if we encounter any problems at startup after recovery, we advise you to read our guide to Fix MBR on Windows to restore boot loader and computer startup.
Conclusions
Using Macrium Reflect we will get an extremely fast and practical backup tool to create system images for any version of Windows; the images created are easy to restore, also thanks to the use of the dedicated recovery environment (available both as a separate boot partition and as an emergency disk).
Always with a backup theme, we can avoid using Macrium Reflect by reading the steps described in our guides on how to Create a backup image of Windows 10 and 8 come on Perform Windows 10 Backup automatically.
If we are looking for alternative programs to Macrium Reflect, we recommend reading our guides to best free programs to backup files and the Free Easus Todo Backup Guide for PC.


