You can share large files via p2p network between PCs creating a new private Torrent in an easy way

In this guide we will show you how to create a private torrent with qBittorrent, free and open source program available for Windows, for Mac and for GNU / Linux.
qBittorrent
qBittorrent is an excellent BitTorrent file management program on PC and also provides the tools to create your own private torrents, to be shared only with a select few or with selected people. We also talked about it in our article on Alternative programs to uTorrent to download Torrent.
Activate the personal track server
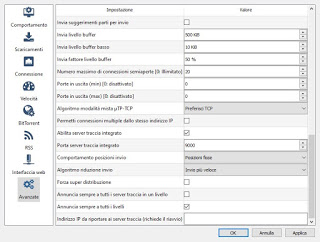
In order to create your own private torrent, we must first activate the track server (server tracker) on our qBittorrent client and forward its port to the router (port forwarding). So let’s open the program, click on the gear button or go to Tools -> Options, press on the menu advanced and scroll through the entries until we find the entry Enable integrated trace server, which we will have to activate with a check mark.
Let’s mark the port number in the entry Integrated trace server port (default is 9000), then press down on apply is OK.
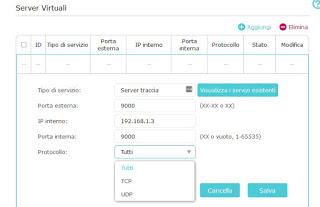
Now we will have to proceed with the forwarding of the correct port inside our modem or router for Internet access: we obtain the IP of the PC in use from the network settings, open any web browser and type, in the address bar, theAccess IP for the router configuration panel. Once logged in, we search for the menu Port Forwarding, Virtual Server, NAT Forwarding, Configure doors or similar items and configure the forwarding of the port of the trace server, entering as IP the one of the computer where qBittorrent is running, as port 9000 (or the one set in the program) and as protocols TCP is UDP.
After this configuration, we check the correct opening of the door from the Open Port Check Tool website.
Create the private torrent
Once the track server is activated, we can move on to creating our own torrent; open qBittorrent again, click on the top Tools and press on Creating a torrent.
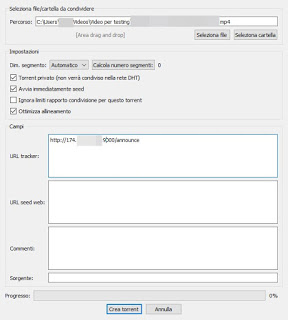
We insert the path of the file or folder to be shared using the buttons at the top right Select file or Select folder, put a check mark on the items Private torrent (will not be shared on the DHT network), Start seed immediately is Optimize alignment and insert inside the field URL tracker the following string:
http: // (IPaddress): (portnumber) / announce
Instead of (IPaddress) we will have to insert our public IP of the Internet connection (obtainable from here) and instead of (Portnumber) we will have to enter the port of the trace server configured a little while ago (base 9000).
At the end of the configuration, press the button at the bottom Create torrent and we choose a name and a path where to save the file with the .torrent extension. Now the torrent is ready and qBittorrent will automatically position itself in seed to supply the file to anyone requesting our private torrent.
For create a magnet link just right click on the private torrent, loaded inside the qBittorrent interface, and click on Copy magnet connection.
Share the private torrent file
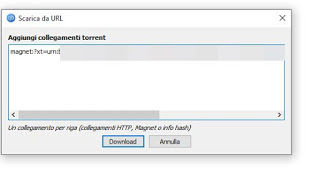
After creating our private torrent, we won’t have to do anything else leave qBittorrent and the PC on which it is installed on is to provide to our friends, colleagues, relatives or anyone we wish a copy of the .torrent file or share the magnet link created just now.
For the download they can use both qBittorrent and any other compatible client, such as uTorrent.
The download will start automatically after a few minutes and, whoever finishes downloading the file, will in turn become a new seed, able to increase the download speed to any new user who starts the private torrent.
The private torrent is not visible to other BitTorrent users that do not have the links or the magnet; to increase security when sharing a large file via private torrent, we recommend that you encrypt the torrent in a password-protected archive, as seen in our guide on How to encrypt files on PC and smartphones.
Conclusions
Creating and sharing a private torrent can be a very good alternative to sharing via cloud or on massive file sharing services, since it is respectful of our privacy, we have a good form of control on file sharing and we can protect its content by adding the file private torrent to a compressed archive (indispensable when we share sensitive or risky data via torrent).
If we don’t know in detail how torrents work, just read our in-depth analysis How Torrent download works, how it downloads and how many problems to find all the answers.
To download torrents on our Android smartphone, we recommend you read our guide at The best apps to download torrent files from Android.
If instead we wanted to download torrents without leaving the PC on, we can read our guide on how Download torrents without keeping your PC on: all alternatives.


