 Although digital files (PDF, Doc, etc.) have become an important component of the work in an office, on many occasions it is still necessary to print forms, diagrams, and graphics on sheets of paper, using the professional multifunction printer present in the office or in the corridor that acts as a link with all the offices present.
Since it is not possible to physically connect all the computers in the office (or home) to the printer, it may be a good idea to equip a print server that offers a good interface with which to share the connection, update drivers and make the print queue accessible to all computers on the network.
In this guide we will show you then how to set up a print server in the office or even at home, showing you what needs to be connected to the printer, how to configure the operating system, how to share the printer from the server to other PCs on the network and finally how to share the printer for remote access.
READ ALSO: Configure a network printer shared between PCs
How to make a print server
To create a print server we will not even have to spend who knows what amount since we can use any computer with Windows 10, to which we will only have to connect the printer and proceed with the configuration of the necessary functions for network printing, control, and remote printing. If we do not have a computer to use for the purpose we can very well recycle an old laptop or assemble a small cheap PC, as seen in the guide Component prices for a PC from 300 Euros good for each use.
Connect the printer to the server
First, we will have to connect our printer directly to the PC chosen to operate as a server. For the connection, we can either use a USB cable for printers or use an Ethernet cable but having the foresight to connect the server to the office network via Wi-Fi.

The simplest and most immediate configuration sees the print server connected via a USB cable for printers so that the Ethernet port can be left for connection to the router or modem; alternatively, we can connect the printer via Ethernet cable to the LAN port of the server and connect the latter to the network via a USB Wi-Fi module.
If we do not want to use the wireless connection for an important process such as printing, we recommend that you install an internal PCI card such as the 2 Port Gigabit Ethernet PCIe Network Controller Card on the print server, so as to use an Ethernet cable for the printer. and an Ethernet cable for accessing the LAN and the Internet. Always make sure that the printer is connected by cable, so as to avoid most of the problems deriving from wireless connections.
Share the printer on the network
After making the connection with the print server, we immediately connect a monitor, a keyboard, and a mouse for configurations; at the end, we will remove these devices and use the only remote control to access the features.
As a first step, we will have to install the printer drivers in use, so as to immediately exploit its full potential. To install the drivers we can refer to the drivers on the CD included with the printer, use the drivers downloaded from Windows itself, or download the appropriate one from the manufacturer, as described in our guide Add a printer on Windows.
After adding the printer to the server we must add it as a network printer: to proceed we open the Start menu at the bottom left, look for the item Print management, let’s go to the section Print server, press the right button on the name of the server in use, click on the Added printer, follow the wizard to find the printer configured a little while ago and, in the features window, make sure to leave the checkmark on Share printer.

Alternatively, we can share the printer by opening the Start menu, opening the menu Settings, taking us on the path Devices -> Printers and Scanners, clicking on the configured printer, pressing u Manage, and finally on Printer Properties -> Sharing.

In the screen that opens, put the checkmark on Share the printer, choose a name to give to the share, remove the checkmark on the item Render print jobs on client computers (if present) and press down on OK. From now on, the print server will be visible on the network by other PCs and devices and will be able to print even without having to install drivers on all other connected devices (we will discuss this in the next chapter).
Please note: Access to the printer can only be allowed by someone who knows the account credentials on the print server. To make things easier we can too create a simple local account with a password or set advanced sharing, as seen in the guide How to share files and folders on a computer network on Windows PC.
Add the server printer on individual PCs
After creating the print server, we can add it to all computers on the same LAN (both devices connected via Ethernet cable and Wi-Fi devices); to proceed in this sense we turn on the computer, press the bottom left of the menu Start, let’s open the app Settings, let’s go to the Devices menu, open the menu Printers and scanners and finally press on Add a printer or scanner.

The search for the printer shared by the server will start, which we can add to the computer by simply pressing on Add device. Once the printer has been added, we can immediately print with it in any program by opening the option Print or by pressing CTRL+P on the keyboard. The server will manage the print jobs of each connected computer, offering a shared print queue: print orders will then be handled in chronological order from oldest to most recent.
Control the server remotely
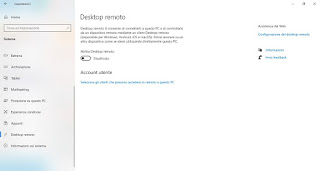
Now that the print server is ready, we need to access it without having to connect a monitor, keyboard, and mouse every time. For the purpose we can configure Remote Desktop, a feature built into Windows 10 Pro and suitable for controlling the print server without any device connected; if we want to follow this path we open the Start menu, look for the app Settings, let’s open the menu System, let’s go to the Remote Desktop menu and activate the item Enable Remote Desktop.
After activating this item we take note of the computer name or of static IP address of the server, let’s go to another computer on the network and open the Remote Desktop Connection app, entering the name or IP recovered a little while ago and enter the credentials of the print server account. If everything went well we will immediately have access to the print server desktop, effectively making a monitor or other peripherals on it useless (we can only leave the PC connected near the printer.
If, on the other hand, we want to control the print server when we are out of the office and may even print remotely, we suggest you use TeamViewer, which we talked about in the guide How to use Teamviewer: PC control via the internet, remote assistance and videoconferencing.
To make the print server immediately available after a restart or at each manual start, we will have to configure the automatic access of the account used on it; for this operation, we invite you to read the guide on how to Remove the password prompt when Windows starts.
Conclusions
A print server will make your work in the office so much easier since any new computer connected to the network can immediately use the shared printer without even having to download drivers, which is necessary if we connect the printer directly to the office modem or router. The presence of a print server with Windows 10 will also allow you to manage print jobs from computers with different Windows versions (Windows 7, 8.1, and 10) without generating conflicts between the various versions of the print drivers: used as drivers only those present on the server, and only they will act at the time of printing, speeding up (and a lot) the whole process.
On the site, we also talked about other types of servers that we can configure, so as to create a complete and modern work environment or home environment. In fact, we can also make a music server, a data server with remote data sharing, and a powerful one server Linux multiruolo, able to adapt to all professional and personal needs.