 When we share a folder on the network on Windows and try to access it from another PC (present on the same network), we will be asked for the username and password of the account currently active on the computer. This behavior can lead to a privacy issue: if we share the folder in an office and we want some selected people to access this shared folder, we will have to communicate to them the same credentials used to log in on the personal PC, exposing us to possible unauthorized intrusions.The thing is even more serious if we use a Microsoft account for Windows logon: We will need to provide your Outlook address and personal Microsoft password to allow access to shares, also putting access to emails and other services offered by Microsoft at risk!
If network sharing is essential to be able to share documents in an office but we do not want to give too much personal information to colleagues or employees, in the guide that follows we will show you how to create shared folders without providing a personal password using a dedicated sharing account other than the personal account used to log into the system.
READ ALSO -> Share files between PCs and view shared folders (Windows, Mac, Linux)
User configuration for sharing
To start we will have to create a secondary account on our Windows PC, whose credentials will be used to access the folder we want to share is read-only. The easiest way to create a new account right away is to open the Start menu on Windows 11, open the menu Settings and take us on the path Account -> Family and other users. If we are on Windows 10 the path to follow is the same.
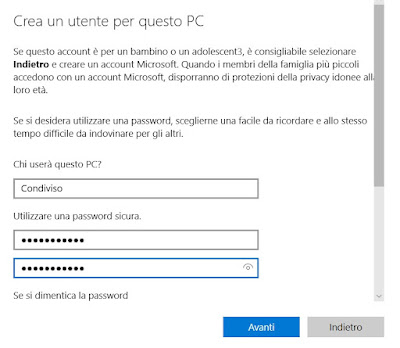
In the new window, we click on the button Add account under the section Other users (on Windows 10 just press on Add another user to this PC), then we create the account to be reserved for sharing. To do this, we need to create a local account: then click on I don’t have this person’s login information and finally click on Add a user without a Microsoft account.
We use a simple username (for example Shared), choose the password (mandatory for this purpose), fill in all the required fields on the security questions, and confirm to make the new account operational.
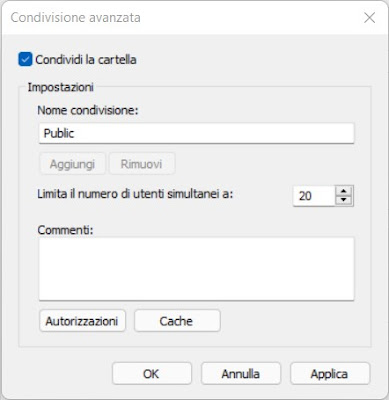
Now let’s take the path where the folder to share (possibly to be created in the folder C:\Users\Public), press it with the right mouse button, click on Propertythen on the card Sharing, and finally on Advanced sharing.
In the new window we put the checkmark next to the item Share the folder we press down on Authorizations remove any other assigned user (by pressing the key Remove after selecting the users in the section Users and groups) and press on add.
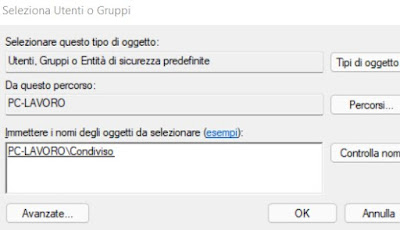
In this window, we write the name of the local account just created (Shared), press the button next to it Check names to verify the correct account name, and press at the bottom OK. We will return to the account configuration window: make sure that only the check next to the item is active Reading (under the column consented) and confirm by pressing the OK key in the respective windows.
We are done on our PC: now we can provide the name and password chosen when creating the local account, without affecting privacy. If we want to share new folders in the future, just follow the procedure from the menu Advanced sharing since the user dedicated to the shares is ready to use.
How to avoid errors in permissions
To facilitate sharing we use the Public folder (C: \ Users \ Public) o we create new folders to share within it; folder Publish which already has the necessary permissions and permissions and makes everything much easier.
By sharing a personal folder (not present in the folder Publish but in our personal folder), we will have to add and assign the permissions of the new account (right-click menu -> Properties -> Security -> Edit on the folder you just shared), otherwise local network users will never have access.
To share a private folder, follow the steps as seen above and then follow the directions provided in our guide on how to change permissions on files and folders.
Access shared folders from other PCs
If we want to access a shared folder with the method seen above, all we have to do is open the Start menu, start the app File Explorerpress the icon Net, and wait a few minutes until the name of the PC that shared the folder appears. If the window informs us that sharing is disabled or that we are on the public network, press on the pop-up and change the suggested permissions to view all network resources without problems.
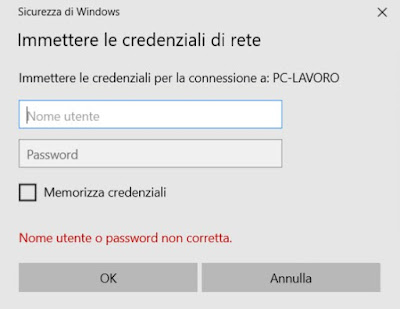
After pressing on the PC name, we will be asked for the username and password to access the share.
If we are authorized to access the network folder, we will surely have received the credentials directly from the head or manager of the department: then enter the username and password in our possession and press OK to access shared resources.
If we want to quickly access shared resources in the future, we put the checkmark on the item Remember credentials so that when the computer restarts we will not have to enter the credentials every time when we access the network resource.
Access shared folders from a smartphone or tablet
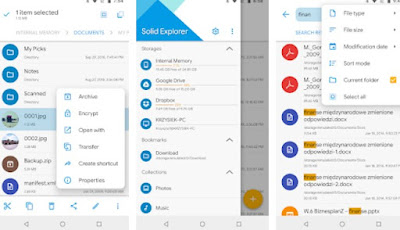
The resources shared with the dedicated password can also be viewed from the smartphone or tablet, as long as they are connected to the same network as the PC that shared the folders. To view shared folders on Android we suggest you install the app Solid Explorer available for free from the Google Play Store.
After installing the app on our device, we press the on+ icon at the bottom right, we select the item New remote connection we choose as the type of connection LAN / SMBwe wait for the appearance of the PC that has shared the folders, put the checkmark next to it, press down on Following.
we choose the Username and password we enter the access credentials when requested, we choose whether to save the credentials (for quick access in the future), we ignore the advanced settings, and press on Following until we get to the sharing summary. Once here we press on Following come on Connect then we close the window by clicking on Fine.
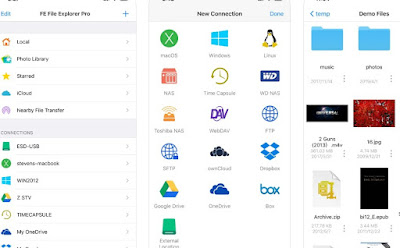
If, on the other hand, we have an iPhone or an iPad, we can immediately access the shared resource by downloading the app FE File Explorer available for free from the Apple App Store.
At the end of the installation, we open the app, provide all the permissions required by the app, press the top right on the+ icon press the icon Windowswait a few seconds for the name of the PC that started the shares to appear (under the section Networks found).
We press on the name of the PC that interests us, we press on User account enter the credentials provided and finally click on Login to access. Also in this case we can choose whether to store the login, so as not to have to re-enter the credentials in the future.
Conclusions
With a procedure that is all in all simple and within everyone’s reach, we have shown you how to create shared folders without providing a personal password but using a username and password dedicated to the purpose.
User creation for shares is a very common practice on large corporate networks but on smaller networks very often Windows folders are shared without knowing that our account is at risk of privacy, since (without the configuration seen above) we will have to provide our Microsoft credentials to access the shared resources.
If we want to remove the sharing of the folder just go to Advanced sharing and remove the checkmark; if instead, we want to exclude some people from sharing it is enough to change the password to the local account created for the occasion following the tips seen in the guide on how to change Windows 10 and 11 passwords.

