OneDrive is the cloud service integrated in Windows 11 and Windows 10 that offers 5 GB of free space to save our personal files, so that they can also be viewed or downloaded on other devices (via the OneDrive app and using the same Microsoft account assigned to the PC ). 5GB may be enough if we only save text documents or Word documents, but if we also use the automatic backup of photos and videos on the phone, the space will run out quicklyforcing us to delete something in order to free up space and save new files.
In the guide that follows we will show you the tricks for free up space on OneDrive both from the local folder and from the cloud folder, so you can save the new files. Most of the time it is sufficient to delete or compress the larger files that we no longer use (and that we have saved locally), while in other scenarios it can be useful to delete the local file to avoid it taking up unnecessary space on the disk.
READ ALSO -> Increase the space of free Cloud services up to a maximum of 100 GB
File types saved in OneDrive
When we open the OneDrive folder in File Explorer we can view all the files saved within the cloud space offered by Microsoft. Next to each file we will find an icon that indicates the type of synchronization applied by the service.
Files marked with a cloud are only available on the cloud (they do not take up space on the computer’s disk): these files are not accessible if the computer is not online and Windows can manage them as simple files by opening them in streaming.
Files marked with a white circle with a green check mark have been previously downloaded to your computer but there is also an online copy in the cloud: these files can be deleted from the cloud, as a copy is available on the PC.
In the end files marked with a green circle with a white check mark they are always available both locally and on the cloud and are permanently synchronized: before deleting them it is therefore necessary to deactivate the option to make them always available, otherwise the deletion of the online file will also lead to deletion on the local space.
Delete local files on OneDrive
To free up space on the OneDrive folder we can delete the files we want to be available only online. To proceed, press the right button on the file to be deleted and press on the item Free up spaceso that only the online copy of the file is kept.
Obviously this deletion system is effective only with files marked as always available or with files present locally (green and white circles); after pressing on the item Free up space the file will only have the cloud icon, a sign that the online file is preserved.
Delete files online on OneDrive
If, on the other hand, we wanted to free the OneDrive cloud space we will first have to proceed with a copy of the file in question (to be saved in another unsynchronized folder), then proceed to delete the file from the cloud space and from the local OneDrive folder.
To save the file, open the OneDrive folder, right-click on the file and finally press the icon or item Copy; now let’s go to another folder (not synchronized), press the right mouse button in the folder space and select the item Paste. At the end of the copy process let’s go back to the OneDrive folder, make sure that the file is always available (right click on the file -> Always keep on this device) then right-click on the file and select the item or icon Remove. The deletion of a permanently synchronized file will also lead to the deletion from the cloud space, thus recovering space.
We remind you that the Documents, Pictures and Desktop folders are automatically synchronized on OneDrive from system is backed up in Windows 11: when we go to choose a new folder for the file to save we choose another one not included in the backup.
Compress files before uploading to OneDrive
If we have not yet uploaded the large file to OneDrive we can reduce the space occupied by compressing the file or folder before uploading. For effective compression of almost any file we can use a compressed file manager such as 7-Zipavailable free for Windows.
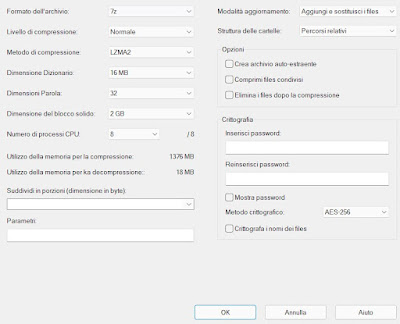
To effectively compress the file, open 7-Zip, go to the path of the file to be compressed, select it then press up on add. In the program settings make sure to select 7z as the archive format, so as to obtain a much higher than average level of compression. At the end, press OK, wait for the end of the process and copy the compressed file to the OneDrive folder.
To learn more we can read our guide on how to Zip (compress) a folder of files.
Conclusions
OneDrive is one of the best cloud services we can use on PCs and mobile devices, but the 5GB limit forces it most of the users to jump through hoops to get the largest files in. For example, if we often shoot videos from the phone and synchronize them with OneDrive we will have to move them to the Videos folder on the PC to prevent the space from running out too quickly.
Those who want to avoid having to always use these tricks to free up space on OneDrive should consider purchasing an additional cloud space through the Microsoft 365 subscription, as also seen in our guides how Microsoft 365 subscription works and how increase the space on Onedrive up to 1 TB.


