 When we buy a computer, one of the parameters that are often underestimated by users is the amount of video memory present on the computer, both if we have a dedicated video card available and if we only have the integrated graphics processor (in modern computers it is present inside the CPU itself, which therefore takes the name of HELP O GCPU). When we start a video or a video game on a computer it will occupy a certain amount of video memory and, if it is sufficient, the frame rate of the game will be adequate even with the graphics settings pushed to the maximum; the problems begin when the video memory is no longer sufficient to handle the graphics or high resolution movies, generating a noticeable slowdown in the form of a drop in frame rate.To avoid this kind of inconvenience in this guide we will show you how to increase dedicated video memory (VRAM) in Windows 10, especially on models that have a video card integrated into the motherboard or CPU, usually the most sensitive to video memory saturation by games or high resolution videos.
READ ALSO -> Best video cards for PC
Guide to Increase VRAM on Windows
The video memory (also called VRAM) can be increased with some simple tricks applicable from the BIOS / UEFI or through the Windows registry: in fact we are going to dedicate a part of the normal RAM memory to VRAM, so as to increase the performance of the computer to a minimum. when under stress. If we have a dedicated video card the increase will not usually bring great benefits, since the VRAM present on video cards is much faster than traditional RAM memory, so an additional VRAM will not be effective anyway.
How to check the amount of video memory on your PC
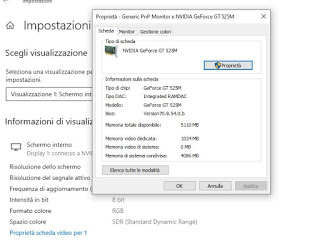
Before seeing what tricks to apply to increase VRAM on Windows PCs, let’s check how much video memory is already present on our system, including the one dedicated by any video card present. To carry out this check, press the bottom left on the Start menu, open the Settings app, go to the menu System, we press on the side menu Screen, scroll down the page until you find the item Advanced screen settings and finally press on the item Video card properties.
In the window that opens, we can check the amount of video memory present on the system under Total memory available. This memory can be divided according to its origin:
- Dedicated video memory: This is the video memory built into the video card, on separate chips from the motherboard. This is the fastest VRAM ever but it cannot be increased except by changing the dedicated video card.
- System video memory: this is the video memory present directly on the motherboard and usable by GCPUs or APUs. On notebooks it is present practically everywhere, while on desktop PCs it is present only on processors with integrated video chip. This memory also cannot be increased.
- Shared system memory: this is the additional memory that the system reserves for the graphic part and is only a part of the RAM memory used as video memory if necessary. This is the only part of the video memory that we can modify and adapt to our needs.
In the following chapters we will show you how to increase the amount of shared system memory, using both the settings in the BIOS / UEFI and using (in a fictitious way) the Windows system registry.
How to increase the VRAM from BIOS
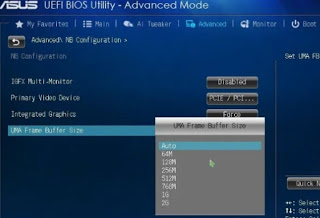
The most effective method to increase the video memory on your computer involves accessing the BIOS or UEFI of your computer, as also seen in the guide How to access the BIOS on computers of all brands. Once you have access to the BIOS / UEFI let’s go to the menu Advanced, we press on the menu for monitor settings or video output (usually NB Configuration), press next to the item UMA Frame Buffer Size (O Video Buffer O Memory Buffer) and modify the value among those available.
If we have 8GB of RAM and intend to use the integrated chip to play some old game, we can also set the highest value available, which usually settles between 2GB e i 4GB; if, on the other hand, we have a smaller amount of memory or want to keep more RAM memory for programs, we recommend choosing a value between 512MB e 1GB. We don’t know what value to use? We can leave the choice to the computer by setting the value Auto, so as to dynamically change the amount of shared system memory based on the use we will make of the computer. At the end of the changes, press on the menu or on the button Exit and we select Save Changes and Exit to reboot the system with increased video memory.
How to increase the VRAM from the registry
Another trick we can use for this purpose is to modify the indicated VRAM value in the screen seen a few chapters ago. This will not substantially increase the performance of the computer but will start the games which, by checking the VRAM present, show an error screen due to the lack of available memory. To proceed, click on the Start menu at the bottom left, search for and start the tool regedit and let’s take the following path:
HKEY_LOCAL_MACHINESOFTWAREIntel
In the left screen of the tool we press the right button on the Intel folder, we use the path New -> Key and we call the new path GMM. Let’s move now to the new folder GMM, press the right button on the right screen, use the path New -> DWORD Value (32 bit), we assign as a name DedicatedSegmentSize, we assign as type Decimal and we write the video memory value that we want to dedicate to the computer, using the integer values such as 512, 1024 O 2048. At the end we click on OK and restart the computer for the changes to take effect. Moving now to the VRAM control screen we will have to observe an increase in the dedicated video memory, but obviously it is only a “dummy” value, since the real amount of dedicated video memory can only be changed by the BIOS or the UEFI: this trick, however, is enough to fool the old games, so that they will start even if the computer did not fully respect the requirements for the video memory.
Conclusions
By increasing the amount of video memory shared with the computer we will be able to start even the slightly heavier games and to better handle high resolution videos, especially on notebooks that have the video chip integrated on the motherboard or the computer. internal CPU. obviously these tricks don’t work miracles, but they help make old computers more usable which otherwise would have to be scrapped.
To get a real performance increase on hardware acceleration, we recommend that you read our guides How to choose the video card for PC graphics and How to choose the video card for PC graphics.


