 Thanks to the collaboration between Microsoft and Canonical, the company that takes care of the development of Ubuntu, we can use, for work or for programming, a Linux distribution within Windows 10, without having to perform partitioning to install Linux next to Windows.
In concrete terms, we’re going to install the text shell used in Linux operating systems call BASH, which is similar to the DOS command prompt but much more powerful and flexible.
The Linux Bash shell allows you to use Windows as if it were a Linux system and, therefore, to browse through folders, open files, rename them, launch programs and all the other operations that you would do on a computer, with a command line from a keyboard, without icons and without a mouse.
In this guide, we will show you how to install and activate the Linux Bash shell inside Windows 10, not only Ubuntu but also other distributions.
READ ALSO: How to install Linux Ubuntu on PC from scratch
How to install Linux Ubuntu in Windows
To start we must make sure we have installed the latest version of Windows 10. Furthermore, it is necessary that Windows 10 is installed in the 64-bit version (in the case of 32-bit system, we read our guide on how the switch from Windows 10 32-bit to 64-bit).
To install Linux on Windows 10, we open the Settings from the Start menu (the gear icon), let’s get to the section Update and Security -> For developers and we activate the voice Developer mode.
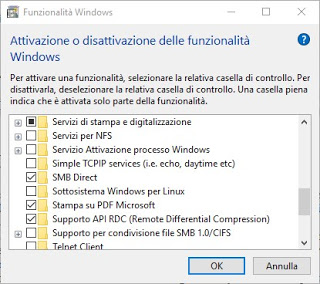
After we open the Start menu again and look for “Programs and features“, let’s get to the menu Activation/deactivation of Windows features and, in the window that opens, we activate the item Windows subsystem for Linux.
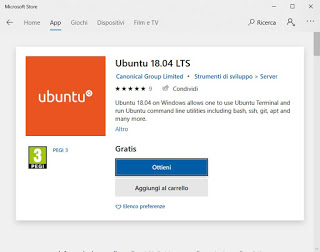
Press on the button OK, we await the end of the installation and restart the computer to make the changes effective. After rebooting, we can install our Ubuntu Linux distribution by opening the Microsoft Store from the Start menu, bringing us to the search button at the top right and typing Ubuntu; we highlight the call app Ubuntu 18.04 LTS and, in the summary screen, we click on Get to install it on our Windows system.
If we wish to try other distributions, just use one of the following links:
- SUSE Linux Enterprise Server 15
- Kali Linux
- Debian
- Fedora Remix for WSL
- pengwin
Some of them are paid, but we can still install a trial version, so you can choose whether it’s worth buying. For Kali Linux, we advise you to learn more by reading our guide Download Kali Linux and all its tools for “hackers”.
Initialize Linux Ubuntu on Windows
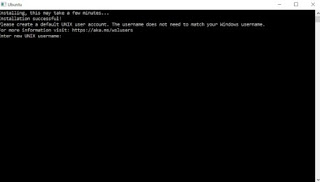
At the end of the installation, we will have to initialize the new distribution so you can use it within Windows. To do this, let’s look for Ubuntu or the name of our distribution chosen in the Start menu, so as to find ourselves with a window similar to the prompt (in reality it is bash).
We await the initial installation and, when requested by the window, we choose a username to access the Ubuntu features.
We write any username and then choose a password (we confirm all the steps with the key Submit or enter on the keyboard). We note that when we write the password, no letter or symbol appears on the screen: it is not a problem, it is a common security measure on Linux.
Note: the password chosen for the account is also useful for raising administrator permissions when it is necessary to use the command sudo.
At the end of the user’s creation, we won’t have to do anything else, since we are ready to use the Linux terminal to its fullest potential. First, we recommend upgrading our Linux system by launching the following command in the Ubuntu terminal window:
sudo apt update && sudo apt upgrade
This will update the package list and get the new versions of those down. To install new programs from the terminal, we use the command instead:
sudo apt-get install
Where instead of package-name we can choose one of the many programs available for Ubuntu and work within Windows. These programs will not interfere with Windows programs, so we can use them without problems and without worrying about conflicts (in fact we are exploiting an isolated environment dedicated to Linux where we can do any kind of experiment!).
Other commands we can use in the Linux terminal are:
- Change folder: CD
- Have the list of files: ls
- Move or rename a File: mv
- Copy File: cp
- Delete a File: rm
- Create folder: mkdir
- Write a new text file: you or dwarf
To learn how to use other commands of the integrated Linux distribution in Windows, we can run the command help, which opens a screen with a basic command guide.
Conclusions
By installing Ubuntu in Windows we will be able to use all the tools that work from a terminal, without having to install the entire distribution on a dedicated partition. Obviously we will not be able to use the programs with graphic interface, since the integration offered within the system is only at the bash level (we can run Linux commands or run programs that run on the command line), but for those who program with Linux this is not a problem, since most of the tools offered on Linux work very well from the command line (and reflection works well on Windows too, taking advantage of the integration seen in this guide).
If we need Linux programs with a graphical interface, we advise you to read our guides Linux Ubuntu to install for free is How to install two operating systems to choose at startup. If instead, we want to learn how to best use a Linux operating system, we advise you to read our guide on Linux directory: what are the main folders of each distribution.


