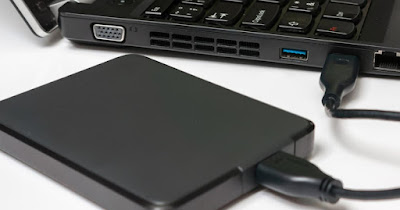
USB external drives can be used in multiple scenarios; in most cases they are used as backup disks for personal files, but the more experienced can use an external disk as a real one emergency operating systemgreat when your PC no longer starts and you need to save your personal files.
If we also want to create our emergency disk in the guide that follows we will show you how to install windows on external USB driveso you can connect it in case of need to any blocked computer and start a Windows environment where you can recover all the files or where to work in an emergency, waiting to repair the PC calmly.
READ ALSO -> If Windows 10 or 11 doesn’t start, how to save everything and reinstall
Prerequisites
To install Windows on external USB drive we can use any USB external SSD equipped with USB 3.0 cable; it is worth taking advantage of the USB 3.0 protocol in this scenario, since we will have to start an entire operating system and it is necessary to immediately obtain a good speed in writing and in reading. The best USB external drives we can buy for the purpose are:
- Netac PSSD 250GB (41€)
- Crucial X6 500GB Portable SSD (69€)
- TOPESEL 500GB Portable External Mini SSD, USB 3.1 and Type C (79 €)
- Samsung 500 GB Portable External SSD, USB 3.2 Gen 2, 10 Gbps, Type-C (79 €)
- Western Digital WD My Passport Go SSD Portatile, 500 GB (99€)
And if we have a disused hard drive or disassembled from some old PC we can reuse it for the purpose thanks to case HDD o enclosure HDDsuch as those available below:
- GeekerChip 2.5 inch USB 3.0 HDD SSD Case Esterno (10€)
- Inateck – External hard drive bay, 2.5-inch USB 3.0 (12 €)
- Verbatim Store’n’Go Enclosure Kit 2.5″ USB 3.2 Gen1 (14€)
- LC-Power LC-35U3 Case Esterno per HDD 3,5″ (22€)
- UGREEN Case Esterno Hard Disk 3.5″ (33€)
On the same topic we can read our guides to types of PC disks, hard disks or SSD drives, internal and external come on how to connect drives to PC via USB: SATA adapters, cases and docking stations.
Prepare external USB disk
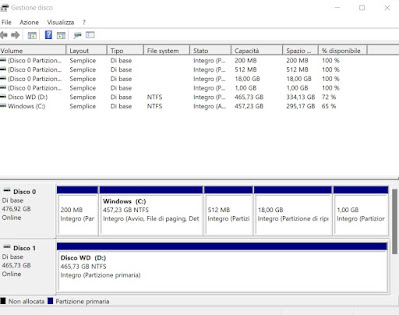
After choosing the external USB disk to use, connect it to a perfectly functional PC via USB cable, make sure that there is no important file inside and open Disk Management on Windowsby right clicking on the Start menu and pressing on the item Disk management.
We delete any partitions present on the external disk by right clicking on them and using the item Delete volume. Now that the disk is no longer partitioned let’s create two new partitions by right clicking on the unallocated space and selecting New simple volume. In the windows will appear choose not to assign any letter to the new drives and choose the size of the space and the file system to use.
For maximum compatibility with all PCs, we recommend that you create two partitions with the following characteristics:
- System partitionwith FAT32 file system and size 100 MB
- Boot partitionwith NFTS file system and size at least 60 GB (we can create this partition using all the remaining space)
Il disk must be initialized in MBR to ensure maximum compatibility on all PCs; if we don’t know how the disk was initialized we can also read our guide on which disk partition style to use and MBR or GPT conversion.
Install Windows on external USB drive
With the external USB drive ready we can proceed to install Windows inside it. To start let’s download the Windows 10 ISO using one of the methods described in the guide. Windows 10 lends itself very well as an emergency system, as it is compatible with MBR and with the partitions created previously.
At the end of the Windows ISO download we download the program on our computer WinToUSB, available for download from the Filehorse website. For this guide we recommend you use only version 4.1as later versions are severely limited.
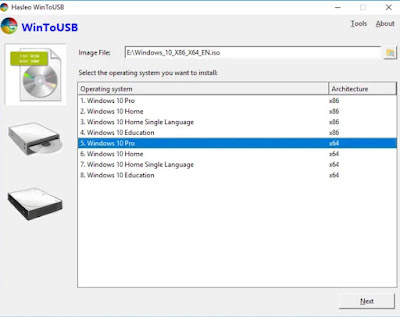
After installing the program, let’s start it, ignore every update request, press the first icon at the top left, press the button next to the field Image filechoose the Windows ISO (downloaded a little while ago) and select the version of Windows to install on the external USB drive (for maximum compatibility we use a version with x86 architecture).
Let’s now press on Avanti and select the external USB drive; in the new screen we select the System partition and the Boot partitiontaking care to match the selections with the previously created partitions.
Let’s check the selections one last time, confirm Legacy as a configuration option then press down on Avanti to start the actual system installation. At the end of the process we will have installed Windows 10 on our external USB driveprecisely and without errors.
How to start Windows from USB disk
Now that Windows is installed on the USB disk, it is advisable to perform the first boot, so as to configure Windows and always have it ready “for action” when necessary. To proceed, connect the USB disk with Windows to the computer, restart it and let’s change the boot ordermaking sure to select the external USB disk in the list that will appear. The first time you start your computer, you may need to restart your computer several times to install Windows: at each reboot, remember to always change the boot order, otherwise the system on the PC will start.
After starting Windows from the disk, the system installation will start, where you need to provide the initial information, create the user account and choose how to use Windows. At the end of these operations we will have access to the real Windows desktopwhere it is possible to install programs to be used in case of emergency or sudden PC crashes.
Obviously this Windows can also access hard drives and SSDs on the locked PC. If we do not see the disks on the blocked PC, right-click on the Start menu, select Disk management and right click on the resulting disks Offlinethen we press on Online to make them visible from the operating system installed on the disk.
Switching from one PC to another, it is easy for the mouse input system to change, since on laptops we have a touchpad and fixed a mouse; to avoid running out of mouse cursor when we switch PCs let’s take a classic USB mouse with uswhich will always be recognized by Windows on any PC we connect the disk.
If we don’t know which programs to add to our emergency Windows, we recommend that you read our guides to Portable antivirus and emergency scanners against viruses and malware eh 10 Programs to always and immediately install on Windows PCs.
Conclusions
After reading this guide we can very well avoid, from now on, the creation of live USB sticks with Windows; the external USB disk is much faster than any USB stick and can start Windows without excessive problems in reading and writing, as if it were a real pocket computer. By carefully following the instructions provided in the guide, the disc with Windows will be able to start on any computer, both the old ones with BIOS and the new ones with UEFI.
If instead of Windows we wanted to use Linux to create the emergency disk, we recommend that you read our guides on how install a Linux ISO on USB e le best Linux distros to recover Windows disasters.


