If we have a Windows PC with many users available we can run into a space problem, since in the end the hard disk or SSD is only one and must be enough for all users.
As a rule, in fact Windows storage space is managed freelywith all users who have free access to the residual space still available: if one of the users downloads a file that occupies 10 GB or more, this file will take away space from all the other users, who will have less space available once done login.
This problem can be overcome using Windows quotas, that is, assigning a space limit for each user on the computer. Using quotas we will be able to decide how much space each user can use, without taking away space from other users (who in turn can only use the space assigned in quota).
In the guide below we will show you how to limit disk space for each Windows user using quotas. The guide will be made using Windows 11 as an operating system, but the steps are identical on Windows 10 and all versions of Windows that support disk quotas.
READ ALSO -> See the disk space occupied by large files and folders
How to enable a quota for all users
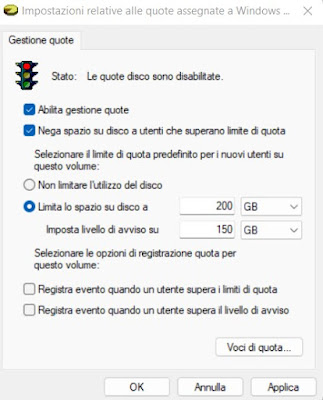
To activate the quota for all users on the PC, log in to the computer with a administrator account (we cannot activate quotas with a simple account), open the Start menu, select the app File Explorerwe press on the side menu This PCright-click on the main disk (usually drive C :), press on Propertyfinally open the tab Quota management and finally press the button Show quota settings.
In the window that opens, activate the voice Enable quota managementlet’s activate the voice Deny disk space to users who exceed quota limitwe check the item Limit disk space to and we set the two parameters, using the drop-down menu to choose the size of the quota (usually GB, but we can also use TB or MB) and to choose a warning threshold (the user will receive a warning on reaching the set quota ).
At the end of the changes, click on OK to apply quotas to all users on the computer (simple users and other administrators).
How to enable a quota for a specific user
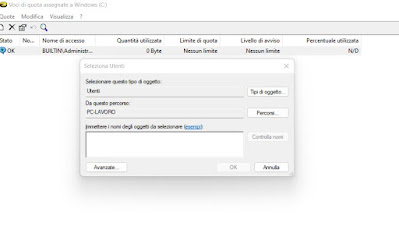
If a PC user needs to have a different quota than the others, we can customize the quota assigned to a single user by taking us to the same screen Show quota settings (seen in the previous chapter) and pressing down on Quota items.
In the new window we press at the top of the menu Quotewe press on New quota entry and insert the name of the user to whom the custom quota is applied, with the help of the button Check names not to make mistakes.
After creating the new quota entry, a window will open where you can choose the custom quota limits and the specific warning level for that user. At the end, click OK to make the changes effective.
Thanks to this setting we can set a fixed quota for all accounts (for example 300 GB) and limit the space for a test account or for a user’s simple account (setting the limit of 200 GB only for him).
How to enable quotas from group policy
Quotas can be changed by administrator accounts on Windows. If we operate on business PCs we can use group policy to enable the quota and prevent a user from taking all the disk space (which is essential if the company PC foresees the use of different users).
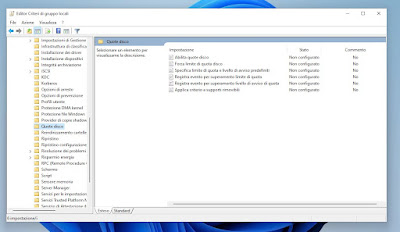
To activate quotas from group policies, open the administration PC or the administrator account on the computer with Windows 11/10 Pro (the Windows 11/10 Home version is not supported), press WIN + R on the keyboard, type gpedit.msc to open the Group Policy Editor and take us to the path Computer Configuration -> Administrative Templates -> System -> Disk Quotas.
In the right part of the window we activate the items Enable disk quotas, Disk quota limit force and we use the voice Specify default quota limit and warning level to change the assigned quota level.
Obviously, we will also have to repeat the configuration on the group policy files of the individual users on the PC, copying (if necessary) the configuration on all the company PCs that require the activation of quotas.
To learn more we can read our guide on how to use Windows Local Group Policy Editor (gpedit.msc).
How to enable quotas from registry editor
On Windows 11/10 Home there is no group policy editor, but we can activate the disk quotas of a company PC using the registry editor, by changing a simple parameter.
To follow this path we press WIN + R on the keyboard, we type regedit and, once the editor is open, let’s go to the following path:
Computer\HKEY_LOCAL_MACHINE\SOFTWARE\Policies\Microsoft\Windows NT\
Within this folder we will find the subfolder DiskQuota; if it is not present, press the right button on the folder Windows NTclick on New -> Key and insert the name DiskQuota.
After gaining access to the DiskQuota folder, press the right button on the right side of the editor, press on New -> DWORD Value (32 bit)we assign as a name Enable and we confirm; now all we have to do is press on the voice Enable and set the number from 0 to 1 to enable the function.
To force the use of the quota associated with the computer, create a new entry with the right mouse button (New -> DWORD Value (32 bit)), we assign the name Forcedconfirm and press on it to pass the value from 0 to 1. At the end of the changes we restart the PC to immediately activate the quotas on the PC in use.
Conclusions
Quota management on Windows can be very useful on business PCs that have multiple user accounts, so as to prevent a single user from taking all the remaining free space by downloading very large files.
At home it is little used because often the computer has only one active user, but it can be useful if we have minor children associated with a simple account who tend to fill the computer disk with games, movies and other very large files.
To learn more we can read our guides on how free up disk space on your Windows PC in 10 ways come on how to increase disk space on PC.


