On Windows 11 and Windows 10 it is really very simple to share folders for network access: just press the right button on any folder, pressing on Properties, taking us to the Sharing tab and pressing the button Share. After sharing the folder there is no visible button to remove the share, which is thus always available to all other devices that connect to the same network. Luckily we can always remove the sharing but we will have to act from the context menu or command prompt.
In the guide that follows we will show you how to remove network folder sharing on windows using both the simplified procedure and the advanced Windows procedures, which include command prompts and share management tools. The advanced procedures are decidedly more effective and decisive, but we can also limit ourselves to removing access to the shared folder, so as to prevent any future access (even if it will remain shared).
READ ALSO -> How to share files and folders on a computer network on a Windows PC
Remove shared folder access
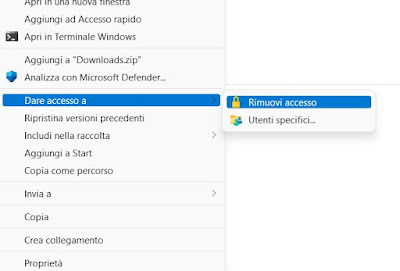
For those who do not want to tinker with the advanced Windows tools or with the prompt, they can quickly remove access to the shared folder by pressing the right button on it, pressing on Show other options (on Windows 11), expanding the menu Give access to and finally pressing on Remove access.
With this procedure all access will be revoked and the folder will no longer be accessible on the network. At the system level, the folder will remain shared, but we will have quickly removed access to all the PCs or devices that we had saved in memory its access. Obviously, if a user tries to access the folder again, he will be able to do so, unless the access password is changed or the user with whom the folder is accessed is blocked.
If we have access problems we can also read ours Guide on Access Denied in Windows.
Remove folder sharing
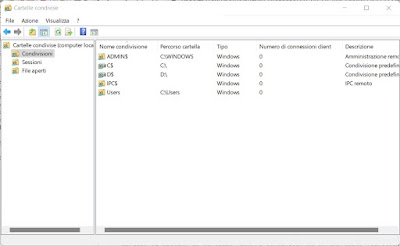
To remove the sharing of a folder, press the WIN + R keys on the keyboard, type in the text field fsmgmt.msc and press the OK button to open the network share management tool.
In the new window we identify the folder we shared, right-click on it and press Stop sharing to remove the network share. On some system folders it is not possible to remove the share: we can recognize them by the $ symbol.
Another procedure that we can use to remove the sharing involves the activation of advanced sharing and its subsequent deactivation. To use this procedure, press the right button on the shared folder, press on Propertylet’s get on the board Sharingclick on the button Advanced sharinglet’s activate the voice at the top Share the folder then we press down on OK.
Now let’s repeat the steps to remove the check mark from the item Share the folder: confirm OK at the bottom and confirm the warning message that will appear to permanently remove the share.
Remove Advanced Folder Sharing
If all the above methods didn’t work, we can remove network folder sharing on Windows directly from command prompt, in a definitive and safe way. To proceed we press the Start button, we search cmd to find the command prompt right away, right click on the prompt and start it using voice Run as administrator.
In the prompt we type the following commands to remove any network share:
- We type the command net share to open the list of shares on your computer.
- Now let’s look for the sharing to be deactivated, paying attention to the name under the column Share name.
- Identified the share to be removed, type net share SHARE-NAME / deletewhere instead of SHARING-NAME we will have to enter the name of the share we want to remove.
- We reward Enter O Enter on the keyboard to confirm and close the command prompt.
By accessing the properties of the previously shared folder and pressing on the tab Sharing we will have proof that the folder is no longer shared.
Conclusions
On Windows 10 and Windows 11 it is very easy to create a network share accessible from other PCs and other compatible devices (for example smartphone Android), but it can be very difficult to remove the share unless you completely delete the folder (which is impossible if we have shared our user’s folder).
With the procedures seen above we will always be able to remove the network shares for the system folders and for the folders that we have shared by hand, using both simple methods and the Windows command prompt (much mistreated but very useful for solving this type of problem).
To avoid most problems, we share the Windows folders directly in the context menu (as seen at the beginning of the guide, using the item Give access to -> Specific users) or by using the function Advanced sharing in the path Properties -> Sharing (from the context menu of the folder), since this can be deactivated at any time.


