 The computer’s hard drive is the internal part that gets ruined the fastest and also the slowest hardware component. Needless to have a super powerful 10 core processor with the latest graphics card and 16 GB of RAM if there is an old and slow hard drive that acts as a bottleneck and ruins every performance. On the other hand, even with a normal PC, two or three years old, not particularly powerful, it can be upgraded to incredible levels just replacing the hard disk with a new solid-state drive SSD.
What may discourage you from replacing the hard disk is not the price, but the hassle and difficulty of having to reinstall everything, the operating system, and programs, on the new disk. Fortunately, today we can act in a very short time, performing replacement of the disc and without losing anything, without having to reinstall Windows or other programs and dedicating only an hour or so (sometimes even less).
In this guide, we will show you how to replace the hard disk to upgrade the PC in an hour both on fixed PCs and notebooks.
How to replace the hard disk to upgrade the PC in an hour
This operation is available to everyone, all you need to do is get everything you need and use a single program to clone the old disk onto the new one.
Preliminary requirements
What is needed to replace the computer’s hard disk quickly and painlessly are:
- An SSD disk, which is larger than the original hard disk. If the new disk was smaller than the old as available space, it is not a problem anyway, the important thing is that the space occupied on the existing disk is not greater than the capacity of the new SSD or hard disk. Otherwise, it will be necessary to delete unnecessary files and have another external drive or even a USB stick in which to move important data;
- A USB stick to be used as a recovery disk;
- Connection cable for the second disk: to connect a new disk to the computer we can use the HDD USB enclosure (of the houses for the disks) or a SATA-USB adapter to connect the disk contacts directly and use a common USB socket to read it.
THE best SSDs what we can use for the guide are:
- Crucial MX500 Internal SSD, 500 GB (€ 64)
- Samsung 860 EVO 500 GB Internal SSD (€ 77)
- Silicon Power SSD 1TB 3D NAND A55 (€ 97)
- Samsung Memories 860 QVO SSD Internal 1 TB (110 €)
- SanDisk 1TB Ultra 3D SSD, SSD Drive (€ 148)
If we intend to use I USB case for discs, we have selected the best ones below:
- POSUGEAR External Case for Hard Disk 2.5 “, USB 3.0 (€ 8)
- Sabrent SATA 2.5 Inch Hard Drive Case (€ 9)
- EasyULT External Case for Hard Disk 2.5 “, USB 3.0 (€ 9)
- AUKEY External Case for Hard Disk 2.5 “USB 3.0 (11 €)
If instead, we wanted to use the SATA-USB adapters, the best are:
- EasyULT USB 3.0 to SATA adapter (€ 8)
- Sabrent USB 3.0 SATA Hard Drive Adapter (€ 9)
- UGREEN SATA USB 3.0 Adapter for SSD HDD (€ 18)
Any pen with at least 8 GB or more, such as this -> Kingston DataTraveler 100 G3 Flash Drive, 32 GB (€ 5) is fine for the USB flash drive.
How to clone the disk
First, we insert the SSD inside the USB case or use the SATA-USB adapter, then connect it to the computer on a free USB port, so that it is recognized by the operating system.
Now we will have to install on our computer the free Macrium Reflect program, the best for the cloning procedure and to restore the boot quickly in case of problems.
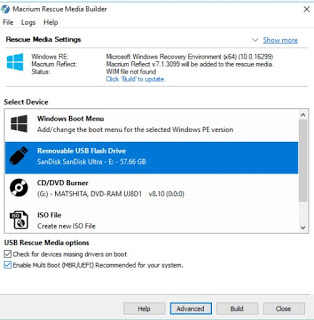
After installing Macrium Reflect on our PC, we immediately create the recovery disk of the program, very useful to restore the boot sectors in case of problems after cloning. To do this we connect the empty USB key to the computer, open the program and click on the icon at the top left Create bootable Rescue media.
From this menu we select Removable USB Flash Drive, let’s make sure our key is selected so let’s click Build to create the recovery disk.
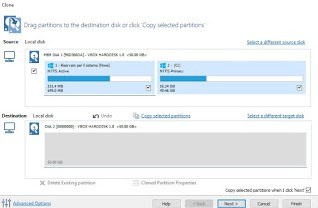
Let’s move on to disk cloning real: in the main screen of the program, we identify the old disk (usually it is visible at the top and has a partition reserved for the operating system), so we press on the item Clone this disk.
In the window that opens, we will have the old disk at the top and the new disk at the bottom, ready to be cloned. Let’s make sure that the right disk is selected in the section Destination, so we click on Next is Finish to start the cloning procedure.
At the end of the operation (this is the longest phase, which can take even an hour) we will have made a faithful copy of our old SSD disk, so as to be able to make the replacement without any particular problems. Before proceeding to the next step, we remove the USB HDD case or the SATA-USB adapter from the computer and disconnect the new disk from them so that it can be installed on the computer.
Install the new disk
Now that the cloning has been done, we turn off our computer and proceed to remove the old disk.
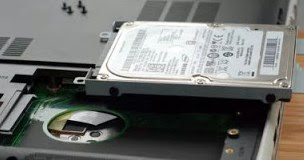
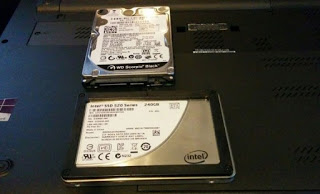
If you are using a laptop turn it off, turn it upside down and access the access door to the disk (we will have to unscrew small screws to access it). Once you have access to the compartment, remove any fixing screws, pull the old disk from the housing and insert the new one, paying attention to particular support houses or adapters present.
Now all that remains is to close the doors, restart the necessary screws e boot up the computer to see if the operating system starts: if we have followed everything carefully, the system will immediately start running smoothly, immediately recognizing the new disk as a system unit.
In another article, we saw how to clone a hard disk to another disk with an exact copy using another program.
In case of problems
If your computer did not boot properly, you need to check in the BIOS if the boot options are correct as described in our guide on how to change the computer boot order.
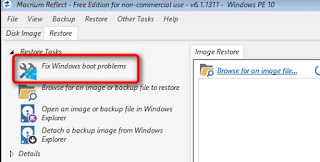
If there are still problems we connect the recovery key created at the beginning of the guide and, in the screen that appears, we use the entry Fix Windows boot problems to start the restore procedure MBR (Master Boot Record) and del BCD (Boot Configuration Data).
Alternatively, we can reset the boot by reading our guides on Ways to repair Windows 10 and create the recovery disk is Fix MBR on Windows to restore boot loader and computer startup.
If the cloning did not go well and the computer still does not reboot, it will be sufficient to reassemble the old disk to restore the functioning of the PC; if we intend to retry the operation, we use this time a different program like Easus Todo Backup or AOEMI Backupper.
Conclusions
As already mentioned several times, replacing a hard disk with an SSD disk is the best way to upgrade your PC in a visible and almost unbelievable way, much more than can be done by increasing memory or changing the processor.
The old record does not necessarily have to be disposed of, since we can still use it as an external USB disk for backup, as a network disk or for saving videos to watch on a compatible TV. In this regard, we advise you to read our guides on How to format USB sticks and disks, such as Transform internal disk into a portable external drive and finally how to Connect a disk to the router to share files over the network.

