 Those who work a lot with Windows and compatible programs know when it is important to always have a virtual machine at hand where they can do tests and experiments without having to dirty or damage the system on which we work. Those who have installed Windows 11 Pro on their computer can, without having to download other programs, create a virtual machine of the previous operating system (ie Windows 10) and use it only when needed.In the guide that follows we will show you how to use Windows 10 on a PC with Windows 11 by configuring Hyper-V which is the virtual machine manager integrated into the Pro version of Windows 11. This generic procedure can also be replicated for other compatible versions of Windows (Windows 7 and Windows 8.1) and it is possible to emulate Windows 11 natively despite the restrictions on minimum requirements.
READ ALSO -> Virtual PCs and systems emulation: Linux, Windows, and Mac on the same computer
Install Hyper-V
The virtual machine management system on Windows is called Hyper-V and is only available for the Pro and Enterprise versions of Windows 11; this means that, if we have the Home version of Windows, we cannot download Hyper-V to emulate virtual machines.
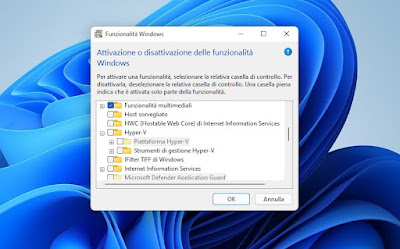
Before proceeding, let’s check what version of Windows 11 we are using, following the steps described in our guide on how to check the Windows version. If we are using Windows 11 Pro or Windows 11 Enterprise we can install Hyper-V on the system by opening the Start menu, typing Turn Windows features on or off, and opening the homonymous voice. In the window that opens, we identify the folder Hyper-V check the box next to it and confirm by pressing OK.
Now all that remains is to wait for the download and installation of the Hyper-V components; at the end, we restart the computer to make the changes effective.
Virtual install Windows 10
With Hyper-V installed on the system, we can quickly create a Windows 10 virtual machine by getting the Operating system ISO and configuring a new virtual machine.
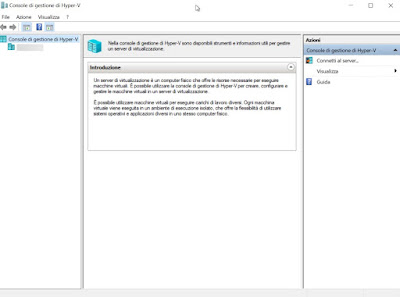
To proceed we open the Start menu, type Hyper-V on the keyboard and open the application Hyper-V management console.
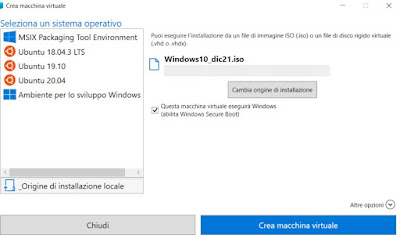
Within this window, press the name of the PC we are using at the top left, then click on the right side on the item Quick creation to quickly create a new virtual machine. In the new window, we click on Local installation source then click on Change installation source, and select the Windows 10 ISO image downloaded earlier.
Make sure that the item This virtual machine will run Windows is checked, then press down on Create a virtual machine to confirm. With this procedure, we will use the settings recommended by Microsoft to immediately start Windows 10 on a virtual machine and use this system also on Windows 11.
If we want to configure Hyper-V settings with the manual procedure (intended for experts), we invite you to read our guide on how to create Windows 10 virtual machine with Hyper-V.
Install Windows 11 in virtual
If we have a computer with Windows 10 Pro operating system but not compatible with Windows 11, we can try the new operating system in Hyper-V, so as to always have an idea of how the menus are made and to be able to use a test environment to make guides or to make videos on Windows 11.
As highlighted in the introduction it is not possible to natively install Windows 11 without minimum requirements, but we can bypass these checks on Hyper-V as well. To proceed, quickly download the Windows 11 ISO from the official website, install Hyper-V on our computer equipped with Windows 10 Pro, open the Hyper-V management console, select the name of the PC in use and this time press on the item New -> Virtual Machinepresent on the right side.
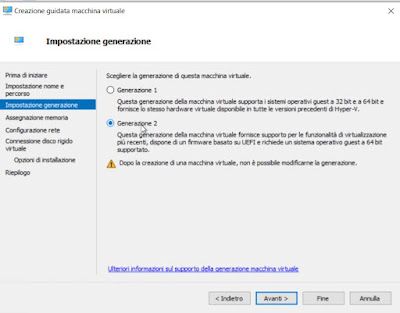
In the windows that follow one another, click on Next until you reach the screen for choosing the virtual machine generation, select Generation 2 and press on Avanti to continue. In the following screens make sure to assign at least 4000 MB as virtual RAM memory, to use the extension VHDX and to indicate the Windows 11 ISO as the system installation source.
After configuring the virtual machine, select it, press up on Settingslet’s open the menu Safetywe check the box Abilita Trusted Platform Module and finally press on OK. Now the system is able to successfully boot Windows 11 in the virtual machine, even if our PC did not have the requirements to start Windows 11.
On this procedure we can also read our guide on how install Windows 11 as a virtual machine on Hyper-V without TPM.
Install other operating systems
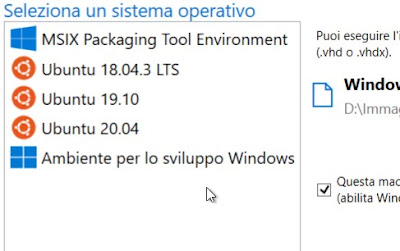
As seen in the Hyper-V console boot screen, other operating systems can also be installed, many of which are available as preconfigured systems to boot on Windows 11.
Those who want to try Linux can use Hyper-V to download some versions of Ubuntu, which can be started with the wizard without having to configure any parameters. For those who want to virtualize Windows 7 or Windows 8.1 all he has to do is get the ISO of these two operating systems (as seen in ours dedicated guide) and repeat the procedure seen in the previous chapter, loading the required system ISO (instead of the Windows 10 ISO).
Conclusions
Hyper-V is undoubtedly the best system to create virtual machines on Windows, since it uses the new processors to correctly virtualize all the components of the real machine and is able to run Windows 11 on Windows 10 PCs (bypassing the controls), run Windows 10 on Windows 11 computers and start installing other alternative operating systems (Linux).
If our PC is not compatible with Hyper-V, we can always virtualize Windows systems using VirtualBoxas seen in the guides on how download and try Windows 11 on Virtualbox and how install Windows 10 in Virtualbox.

