 On laptops with a few years on their shoulders, it is easy to run into a hardware problem related to the power supply: in this scenario, the notebook is connected to the mains through its power supply but does not charge the battery, which indeed continues to discharge over time. Before running out of charge or worse, the battery is completely discharged, it is advisable to immediately analyze the situation and try to solve the problem before it gets worse.In the following chapters, we will show you how to solve the problem of the laptop connected but not charging and restore the correct charge of the battery if it is not really broken.
READ ALSO -> Check your laptop battery status and life estimate
Check cables and power socket
The first trick to apply to solve the problem of the laptop not charging is to thoroughly check all the cables used for the power supply, making sure that everything is in order and inserted perfectly. Let’s check in particular the cable that goes into the wall socket and the cable that goes into the laptop: it is enough that one of the elements is slow to decrease the level of charge carried.
Before trying other methods we suggest you also change the socket used for charging or use a wall socket directly (if we were using a triplet or a power strip): you can’t imagine how many times the current problem originates from the cheap Chinese power strip or the malfunctioning triplet!
Remove the battery and connect your PC without it
If the previous trick did not solve the problem, we can try to remove the laptop battery (if provided by the model) and connect the PC to the mains without a battery. The laptop will thus work only on electricity and we will prevent it from turning off because the battery is close to discharging.
The laptop without a battery does not turn on or turn on only for a few seconds? In this case, we are faced with a serious power supply problem: the power supply is almost certainly broken or one of the components used for recharging (cables, sockets, plugs) has been damaged.
Use the original charger or a compatible charger
If we have used a compatible (non-original) charger so far, we can try to recharge the notebook with the original charger so as to exclude damage to the charger used up to that moment.
We have lost the original charger and need to use a compatible universal charger with all notebook models on the market. In this case, we will have to pay attention to the power manageable by the universal charger making sure it is truly compatible with the laptop’s electrical demands.
To check the current output from the charger, turn the laptop upside down and check the energy label under the item INPUT. If we still have the original charger we also check its label, obtaining the Volt and Ampere value from the field OUTPUT.
Use a USB Type-C Power Delivery charger
If the laptop is new but still has a battery charging problem, let’s check to use the right USB Type-C port for charging. The USB port intended for charging the device is labeled as PD o Power Delivery and is usually present on the upper left side of the notebook.
Who wants to use a USB-C charger to charge the notebook recycling a charger for smartphones or other devices, must ensure that is compatible with Power Delivery and that it supports the power needed to charge the notebook (usually 65W, but more powerful charger models are also available on the market).
Check the manufacturer’s battery options
Many modern notebooks have power management software installed directly from the manufacturer, which can extend battery life. These managers stop the flow of current when we reach a certain charge threshold (usually 80% or 90%) and resume charging the notebook when the discharge phase begins (often configurable as a custom threshold).
If we own one of these laptops (usually Lenovo or Huawei brand) we access the power manager or control center offered by the manufacturer, identify the item to preserve battery life, and raise the threshold up to 95%, so as to charge the battery more without wearing it out. When we use these managers we must expect the notebook not to charge, even when we are connected to the mains: in this case, it is not a problem, but it is a characteristic of the notebook.
Update or reinstall the battery drivers
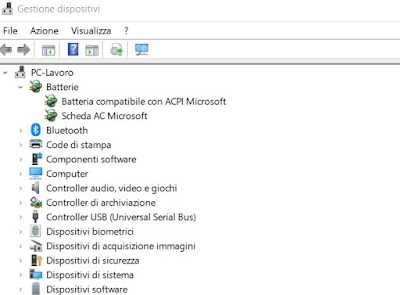
The notebook battery also has its own driver installed on Windows and, in the event of a problem, it can interfere with the charging process. To quickly solve this problem, right-click on the Start menu, open the menu Device management and expand the section Battery.
Expanding the section we will find two devices called Microsoft ACPI compatible battery and Microsoft AC card; to update them, press the right button on each of the items and press on Update Driver.
If we do not solve anything with the update we remove the power plug from the computer, press the right button on both items, press on Uninstall device, and restart the computer for the changes to take effect. On reboot, we wait 2-3 minutes after access then connect the power socket again, so that Windows can reinstall the drivers for battery management and charging.
Conclusions
Charging problems are not always caused by an old battery or a worn power cable: as seen in the previous chapters, the fault of the failure to charge a laptop can also be attributed to the wrong or damaged power supply, using the wrong USB-C port for Power Delivery charging, or the power manager provided by the notebook manufacturer, which may stop charging the device before it reaches 100% (for preserve battery life).
To learn more about battery or notebook charging problems, we can read our guides on how calibrate the laptop battery and how extend the battery life of the laptop.

