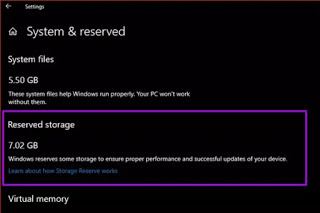
 Starting from the May 2019 update, Windows 10 reserves approximately 7 GB of device storage space for upgrades and optional files. In this way, the system will be able to install the next updates automatically, without those problems of disk space that in the past could have been of impediment. This reserved storage space of Windows 10, even if it is technically a free space, is reported as being occupied by the system and is not available to save personal files.
Before, if the PC’s free disk space was insufficient, Windows could not install the updates correctly and the only solution was to free up space before continuing. Instead with the function of “reserved space“Microsoft makes sure that Windows 10 reserves at least 7 gigabytes of disk space to ensure updates are downloaded, regardless of the amount of available space. When not used by the update files, the reserved space will be used for apps, temporary files. and system cache, improving the daily functionality of the PC.
At this point the question arises: can you disable the reserved space of Windows 10 to recover the 7 GB that it normally occupies?
READ ALSO: Free up space on Windows 10 automatically with the memory sensor function
Check if your PC has a reserved space
The reserved space is activated by default after a clean new installation of Windows 10 version 1903. If the 1903 version is installed by upgrading from a previous version of Windows 10, the Reserved Space is not enabled and will not be at least until the next update ( for example on my PC I do not have it, we will see at the end of the guide how to activate the reserved space).
To check, go to Settings> System> Storage, then press “Show other categories” and press up System files and reserved space. Here, if it is enabled, you will find an entry Reserved space that occupies about 7 GB.
Manage the reserved space and decrease it if more than 7 GB
If you notice that the reserved space of Windows 10 takes up more than 7 GB, it means that there are many optional features enabled or other languages installed. You can reduce this excess of reserved space by turning off the optional features of Windows 10 and uninstalling the languages you don’t need.
From the Start menu, write optional Functions to enter the settings menu that lists the tools installed in Windows 10 that you can remove and that you can always reinstall from the same screen, by clicking on Add a feature.
Disable the reserved space
This type of Disk management that makes Windows 10 might suggest that the system is using 7 GB of extra storage space, while instead, it is just a way in which temporary files and update files are categorized that would still be stored in another position on the system unit. On a PC with a nearly full SSD or with little storage capacity, you can still turn off this reserved space to recover at least part of the space that is occupied by Windows 10. Since most Windows 10 PCs in use in the world does not yet have this function (because it remains disabled in Windows 10 1903 if the update was made from the previous version).
To deactivate Reserved Space in Windows 10, however, you need to be a computer administrator and change a registry key (if it has never been done so far, I advise you to leave it alone).
Then go to the Start menu, write on the keyboard Regedit and start the Registry Editor. Here, use the text box at the top and paste the following path:
HKEY_LOCAL_MACHINE SOFTWARE Microsoft Windows CurrentVersion ReserveManager
On the right side of the window, you will find a key with a name ShippedWithReservese with value 1. Click on it to change the value from 1 to 0. When you restart the computer, Windows 10 will deactivate the reserved space and will not show it between the categories of system files in the storage settings.
On PCs that have Windows 10 installed 1903 after an update, the reserved space will be automatically enabled for the next update if the key ShippedWithReservese has value 1. If you set this key to 0, it will not be activated even with the next update.
If you proceed to deactivate the reserved space by changing the registry key, to re-enable it, you must restore value 1 to the key ShippedWithReservese. If the key does not exist, you can right-click on the white space and create a DWord32 key with the name ShippedWithReservese and value 1 or 0.
Conclusion
The reserved space of Windows 10 is an intelligent and balanced implementation, which favors the installation of updates without memory problems. However, on PCs with SSDs that have less space, you could try recovering some of them by turning off this feature. But we must admit that it is not really so clear how much space can be freed and recovered with this system, so, unless there is a specific need, there is really no reason to disable it.
