
A well-planned trip can turn into an unforgettable experience, and thanks to Google Maps, it is possible to make the itinerary easier to manage with the collaboration of the other participants. Google Maps in fact integrates a convenient, but little used, function for plan a trip both from smartphone and PC.
Of course, there are many other applications that allow you to achieve the same result, but Google Maps is so popular and widespread that it cannot fail to be considered an excellent starting point.
How to organize a trip with Google Maps and share routes and points of interest with participants
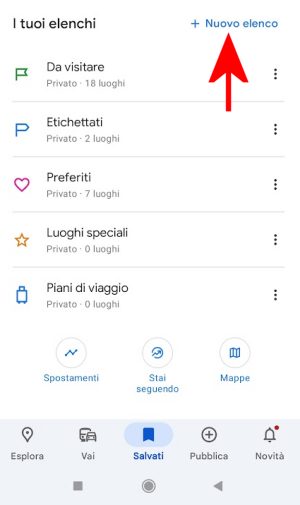
If you use a device Androidyou can organize a trip simply by accessing the main screen of the application by clicking on the icon Save yourself at the bottom, scrolling until you find Your lists then touching New list.
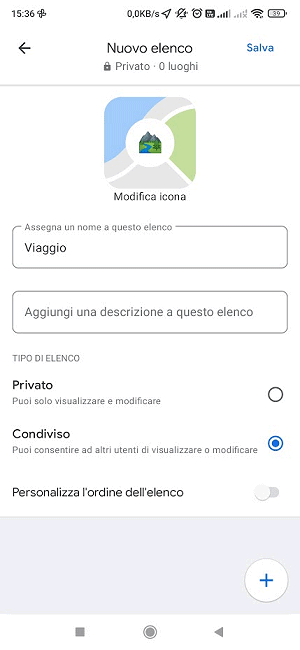
After assigning a custom icon, providing a name and entering a description, choose the option Shared you can send other users details about points to reach and on the planned itinerary.
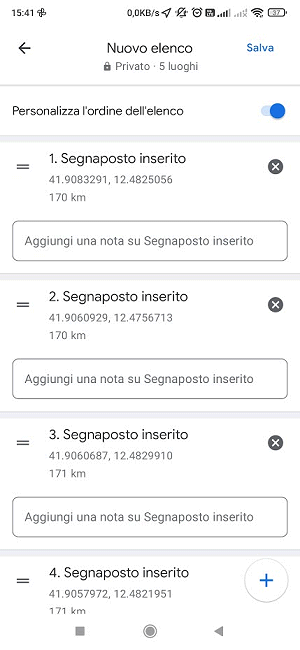
By tapping the “+” button at the bottom right, you can search for places to include in your trip and set actual placemarks on the map. Also activating the option Customize the order in the list and by adding a description for each place, it is possible to define the route to follow. By dragging the symbol representing two parallel lines on the left, you can move the boxes of each placeholder up or down in order to customize the sequence.
With one click your Salva, you can indicate the users authorized to view and modify routes and points of interest. If necessary, you can use the appropriate option create a public link: anyone who owns the corresponding URL can view the various placemarks placed on the map.
By tapping the three dots to the right of the name of theshared list on Google Maps then choosing Sharing optionsyou can possibly enable the changes by the other participants (option Allow list editing) and appoint one or more editors. Editors are the people responsible for applying changes to points of interest applied on the map and travel itineraries.
Navigation within the itinerary set on Google Maps
By accessing the section Save yourself then choosing the name assigned to the journey within “Your lists“, each participant can at any time check the various stages of the itinerary, with the possibility of applying changes (if equipped with the permissions provided by the organizer).
A tap on the name of a placemark allows you to access key information relating to the selected point of interest. The three dots on the right offer the possibility to add notes if necessary.
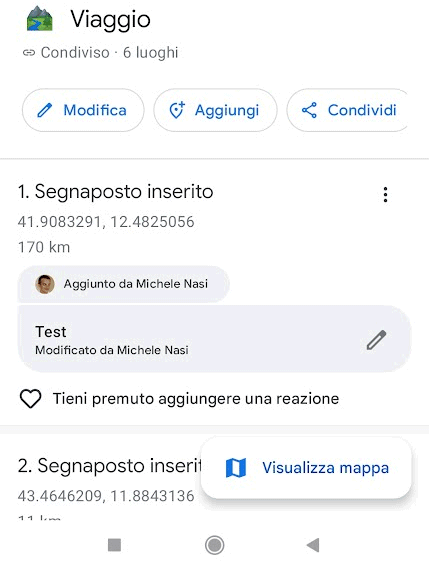
The button View mapdisplayed at the bottom right, allows you to obtain directions from the navigator integrated into Google Maps to reach, by various means, the inserted placemark. Horizontally arranged tiles allow you to quickly jump from one point of interest to another.
At any time, the organizer can use the button add to insert a new place into a previously prepared list.
Edit placeholders for travel organization from PC
The placeholder management created on Maps is also very simple from the Web, for example from a desktop system or a laptop. By logging in from a web browser using the same Google account configured on the mobile device and then going to the Google Maps home page, just click on the icon Save yourself in the left column to find the placeholders already synchronized and ready to be consulted (and possibly modified) also from a PC.
To proceed, just click on Save yourself then on the card Lists and finally select the name previously assigned to the trip.
The three dots next to the name of the list allow you, even from a web browser, to modify the list of placeholders (with the possibility of adding or removing places) as well as acting on the sharing options.