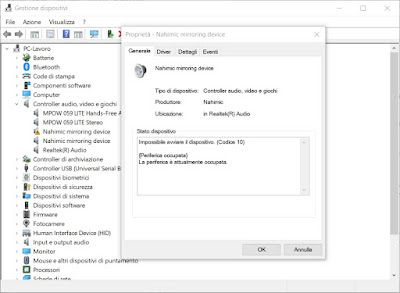
 When we install new drivers or update the computer it may happen that we see the error “The device could not be started (code 10)”, particularly if we open the Device Manager for other purposes (thus noticing the presence of a device with a yellow triangle and the ‘error 10). This error can appear in all versions of Windows and is rather vague, difficult to identify precisely and consequently difficult to resolve.
This doesn’t mean we don’t have to at least try! In the following guide we will show you all the methods to follow to resolve the error “The device cannot be started (code 10)” on Windows 10 and Windows 11, so as to get the device that has this error back in perfect working order.
READ ALSO -> Fix Windows errors from the Event Viewer
What is the 10 code error on Windows?
The error with code 10 Unable to start the device is associated in most cases with removable devices, although it can also be visible on other computer peripherals (as in the image above, where the problem concerns the audio system) . This error appears on Windows when it is unable to properly execute a hardware component.
This error may appear after Windows tries to install the driver for a new device, either from the CD or via Windows Update (most likely scenario).
To check the presence of a device in error, all we have to do is press the right button on the Start menu and open the Device Manager menu, so that a device with a yellow triangle can be displayed; right-click on it and open the Properties menu to get more information on the error generated.
Restart your computer
The simplest way to resolve the “Cannot start this device (code 10)” error is to simply restart your PC, making sure to install any pending updates as well.
To proceed, open the Start menu at the bottom left, click on the power button then use Restart the system or Update and Restart to continue. If this method does not work, let’s go back to the power-on menu and use Shut down the system or Update and shut down, wait for the computer to shut down and then start it.
Uninstall the device in error
If the previous method did not work, we can solve this error by completely uninstalling the blocked device, acting directly from the Device Manager tool. To proceed, press the right button on the Start menu, open the Device Manager menu, check if there is a peripheral with the yellow triangle, press it with the right mouse button and open the Properties menu.
In the new screen, click on the Driver tab and finally click on the Uninstall device button, taking care to also uninstall the device driver software (if required). At the end of the uninstallation, we restart the computer for the changes to take effect.
Update the drivers
Uninstalling the device and driver also didn’t fix it? In this case, it is advisable to immediately launch a system update and check if there is a new driver for the blocked device.
To update the drivers via Windows Update open the Start menu, go to the Settings app, click on the Update and security menu, make sure you are on the Windows Update screen then proceed by pressing the Check for updates button.
If there are new drivers, let Windows install them automatically; if the drivers are optional we can still install them by clicking on View all optional updates and installing the necessary drivers in the Driver updates section.
To learn more we can read our guides How to update Windows 10: Guide to Windows Update and Download updated drivers to install safely.
Run the hardware troubleshooter
If the error code is still present after all these attempts, it may be a good idea to try the hardware troubleshooter, built into Windows and capable of solving the vast majority of problems with drivers, blocked devices, and the like.
To launch this tool, press Win + X on the keyboard, start Windows PowerShell and type the following command from the terminal:
msdt.exe -id DeviceDiagnostic
In the window that opens, click on Next and wait for the scan to finish. This scan will check the connected devices and the drivers present, so that it can repair any errors on corrupt drivers, drivers not installed correctly or other similar problems. Obviously this tool isn’t magical and can’t solve all problems, but it’s worth trying at this point in the guide to see if the code 10 problem fits.
Modify the Registry
If all the methods we have tried so far have not worked, we can try to clear the driver data directly from the registry, so that we can try to successfully reinstall the blocked device. To proceed then we open the Start menu, look for regedit and open the Registry Editor.
Once inside the registry, make sure to open the folder in the following path:
HKEY_LOCAL_MACHINESYSTEMCurrentControlSetControlClass
Here are all the GUID identifiers of the devices; obviously we will not have to delete at random (very dangerous!) but we will have to proceed with criteria, opening the Device Manager again, opening the Properties menu above the blocked device (as seen in the previous chapters), taking us to the Details tab and scrolling through the menu items a drop down until you find class GUID.
Once we have found the right GUID code, let’s go to the registry editor, look for the specific GUID code for the blocked device and identify, in the right part of the window, the presence of the UpperFilters and LowerFilters items, so that we can click on it with the right button of the mouse and delete them. After the deletion we restart the computer for the changes to take effect.
Before working with the registry, it is advisable to always make a backup, as also seen in the guide Backup the system registry and key recovery in Windows.
Perform a system restore
Is the error with code 10 still there and we are unable to remove it in any way? We can also try system restore, thus leaving only our personal files intact (programs, drivers and any other optimizations will be deleted).
To proceed, we open the Star menu, click on Settings, click on Update and security, select the Recovery menu and finally click on the Start button, present under the Reset the PC section.
If we have never performed a reset before, we invite you to read our guide How to reset Windows 10 (Reset PC).
Conclusions
The methods to solve the error “This device cannot be started (code 10)” are not lacking but, if the peripheral is not very important, we can also simply disable it and proceed without too many worries: if the computer works well why go to restore or do so many useless texts!
If the device showing the error is very important, we can try to restore its correct functioning by also reading our guides Solutions to errors on USB ports and flash drives that are not recognized or impossible to use and If Windows 10 does not work or does not respond, how to solve .

