
The market offers many ready-made proprietary solutions to manage firewalls, routing and network security. OPNsense is an open source platform based on FreeBSD that has the primary goal of protecting corporate and home networks. Born in 2015 as a fork of pfSense, OPNsense is designed with the specific intention of providing a more open and collaborative solution with the community that plays a primary role in the development and improvement of the system.
The main functions integrated in OPNsense
OPNsense is characterized by a wide range of functionality advanced, making it suitable for networks of all sizes and complexity. The web interface for configuring and managing settings allows administrators to monitor and control the network from a single console centralized.
Among the most important features we mention the presence of the advanced firewall, capable of filtering IP addresses, ports, protocols, and so on. Network administrators can define specific rules to control the inbound and outbound traffic.
Thanks to the function of content filteringOPNsense can block access to unwanted or potentially dangerous websites, providing greater control over users’ browsing.

OPNsense also supports various technologies and protocols VPN to enable secure connections between remote offices or mobile users and can be deeply customized by installing plugins and additional packages, which add extra functionality and adapt to specific network needs.
The platform also integrates mechanisms of load balancing and failover as well as intrusion detection and prevention systems (IDS/IPS), antivirus, antispoofing and much more. All in order to ensure the highest possible level of network protection locale.
A solution like OPNsense is known for frequent updates as it is released and the default use of HTTPS for all management interfaces.
Hardware required to run OPNsense
Software like OPNsense can be run directly on the chosen system (configuration bare metal) or, for example, within a virtual machine. Many users, depending on their needs, set up a Mini PC used as appliance for the defense of systems connected downstream in the local network.
In general, the developers of OPNsense recommend using a system (physical or virtual) equipped with a processor of at least 1.5 GHz and 8 GB of RAM memory. However, it should be highlighted that thehardware required to perform OPNsense varies significantly based on the operations to be managed.
The services that require a minimum amount of hardware resources are the following: routing (<= 10 Gbps), firewall, DHCP, DNS, Dynamic DNS, mDNS Repeater, NTP, Monit (process supervision), SSH, CrowdSec (system for "collective defense" that receives information from other users).
Among the services that use RAM memory there are Zenarmor (Advanced Web Application Firewall designed to protect web applications from malicious attacks and cyber threats) and the system of intrusion detection meerkat. However, the CPU is heavily loaded by the following services: Zenarmor (on interfaces > 2.5 Gbps), Minium and VPN (especially if the hardware does not support the AES-NI instruction set).
In most cases, especially, with older systems, you’ll need to purchase one additional network card. Provided you use Ethernet cables and suitable network devices, you can purchase a 10 Gbps network card. SFP+ network cards can often be cheaper than adapters Ethernet da 10 Gbps: If your network equipment is physically close to each other, you can choose these adapters to connect to servers and switches by pairing them with a short fiber cable or directly connected copper cable.
Over longer distances, when you don’t have fiber optic cable, you can use 10 Gbps Ethernet cards.
Installation and configuration
Per install OPNsense just download the updated image from the official site then create a bootable media. By booting from this unit, it is then necessary to follow the instructions shown on the screen to install on the hard disk or SSD.

The initial configuration provides, after installation, access to the administration panel via the Web: the default credentials are root for username e opnsense as a password). The wizard guides you through setting up your IP address, network information, administrative passwords, and so on.
The network interfaces of OPNsense (LAN, WAN,…) must therefore be configured according to the network topology by assigning the appropriate IP addresses and setting the security preferences.
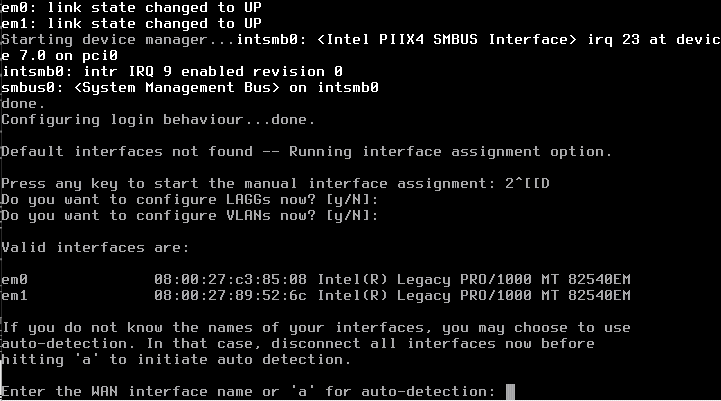
The routine of configuration presented by OPNsense provides, as seen in the image, the identifiers of all network cards present on the machine. First you are asked to specify the card to use for the WAN interface, then the one to be used for the LAN.
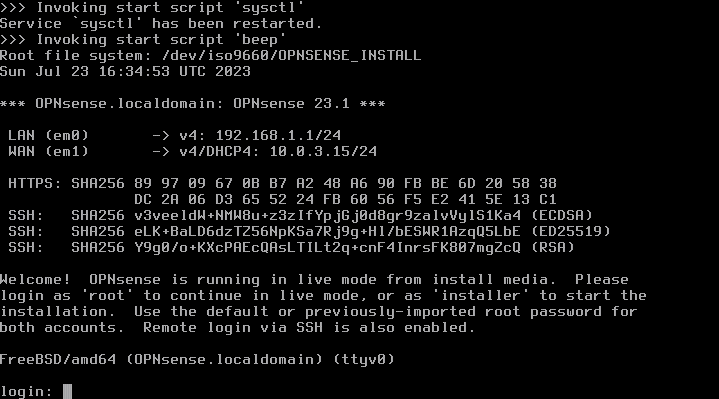
When a screen similar to the one shown in the figure appears, it is necessary to type installer next to login then enter the password opnsense. Here it is essential NOT to use the username root because doing so would not start the installation procedure real and OPNsense but the platform would be loaded in “live” mode.
The firewall rules allow you to allow and block traffic according to network needs: for example, the administrator can authorize access to specific services (HTTP, HTTPS) and prevent all other communications. You can also configure features right away server VPN to allow remote users to access the network securely.
