This energy problem also affects notebooks that, in summer temperatures, suffer from the heat and try to keep the heat at bay with the integrated fans, which often run at full speed (even if we are not doing anything!). In addition to the annoyance of heat, the loud noise of the fans that run wildly with energy consumption that often becomes unjustified is not to be overlooked, especially for older PCs.
Let’s see in this guide how to control and reduce the laptop’s power consumption, so as to reduce the heat produced and increase the battery life (one of the components that suffers most from the heat).
Energy management system integrated into Windows 10
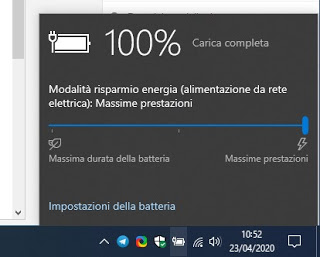
The first method that we advise you to apply involves the use of the energy management system integrated into the Windows 10 operating system. To access it, all we have to do is press the battery icon at the bottom right (if not shown, check-in the hidden menu, viewable by pressing the arrowhead) and move the present slide, moving it from Maximum performance to Maximum battery life.
In this way, Windows 10 will automatically adjust all the parameters of the system to effectively reduce energy consumption and consequently decrease the heat produced (and consequently the noise of the fans).
In the Windows 10 battery management box, which appears by pressing the battery icon on the taskbar, you can open the settings and activate the option that automatically activates the battery saving mode when the charge is less than 20% (this value can be changed).
Manual settings to reduce energy consumption
If the integrated system is not sufficient to “keep” the heat of the PC at bay, we can act on the advanced energy-saving settings to decrease the clock frequency of the processor, so as to force it to “produce” less heat.
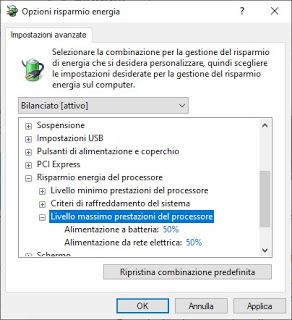
To do this we open the Start menu at the bottom left, search for the menu item Change energy-saving combination, press on the item Change advanced power-saving settings, scroll in the new window until you find the drop-down item Saving processor energy and finally expand the entry Maximum processor performance level.
In the two fields shown (Battery powered is Power supply from the mains) enter as a percentage 50%, so as to force the processor of our computer to run at half of its actual performance; this translates into great energy savings and lower heat production, but we will have to avoid using programs that are too heavy or require intensive use of the processor.
In the same screen where we set the processor’s performance, we can reduce energy consumption by acting also on the network card settings, on the slot settings PCI Express and the settings of USB ports, setting where necessary to Maximum energy savings.
To learn more we can read our article on Power saving options in Windows 10 and Windows 7.
Programs to control energy consumption
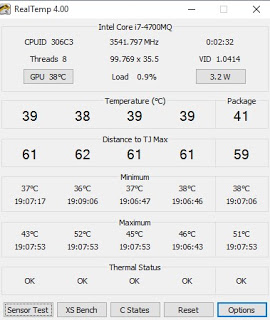
If we want to use a dedicated energy saving program on our computer we can evaluate the use of Real Temp, available for free for Windows.
With this program, we will be able to control the heat emitted by the CPU and its consumption of electricity, so that we can carefully evaluate the trend of temperatures. In addition to temperatures, it also offers a good test for the sensors, so as to evaluate the functioning of the computer very precisely.
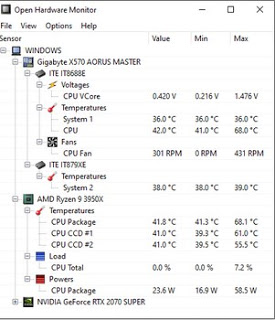
If we want to check all the hardware on the computer, we can rely on a free program like Open Hardware Monitor.
This open source application will show us, with a tree structure, all the active components on the notebook, indicating the detected temperatures, the energy consumption, and the workload performed by the CPU and (if any) video card present in the system. This program is excellent for checking the fan speed and the temperature trend over time: just leave it open during use and check the values expressed under the column after a few hours Max.
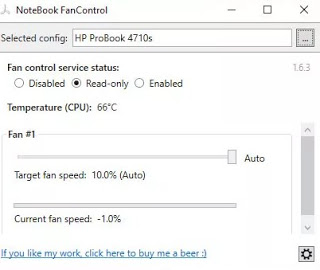
Another very useful program to control and reduce the laptop’s energy consumption is Notebook FanControl, available for free and with an open-source license.
Thanks to this small tool we will be able to personally manage the fan speed, so we can increase or decrease the speed based on the heat emitted by the CPU, creating the right balance between the noise and the cooling of the notebook.
By setting the Automatic mode, the tool will adjust the speed by itself according to the parameters detected on the computer, acting much more effectively than the integrated systems.
If we are interested in using other programs for temperature and heat, we advise you to read our guide to programs to control PC temperature and heat.
Conclusions
Most of the heat and energy consumed by a notebook concerns the CPU and GPU, which we can adjust using the energy saving system integrated with Windows 10 or one of the programs seen above.
If we are a little more experienced users, we can also go into the field of Underclock, modifying the voltage and clock frequency parameters of the processor and GPU directly from the BIOS or UEFI. To learn more about this aspect we can read our guides Change CPU speed, Graphics Card, and RAM: best programs are Programs for CPU processor overclocking and video card.
If our laptop suffers particularly from the heat and the built-in fans make a lot of noise, we can intervene promptly by reading the suggestions proposed in our articles on ways to cool your pc in hot weather is If the pc makes too much noise, reduce the fan speed.

