
Use WSL (Windows Subsystem for Linux, “Windows Subsystem for Linux” in Europen) is today the best way to bring Linux into Windows. Without the need to abandon the Microsoft operating system, you can run the main ones Linux distributions within a window and even install and start Linux programs with a graphical interface. Linux applications that come with GUI (Graphical User Interface) can in fact be added to the Windows Start menu, to the taskbar and can be recalled from any memory location. It’s certainly impressive to see Linux programs executed in windowabove the Windows desktop and next to other Microsoft operating system windows.
While it uses some of the basic features of the Microsoft virtualization solution, there are notable differences between WSL and Hyper-V. Working with virtual machines of WSL, the advantage is that of being able to perform operations on what appears to all intents and purposes to be a real Linux system with the possibility of accessing its file system directly from Windows. Just press Windows+R then type \\WSL$ to have the ability to access the contents of all Linux installations managed with WSL.
How to configure WSL with advanced settings
In the two articles mentioned at the beginning, we saw how it is possible install WSL on Windows 10 and Windows 11. By typing the instruction at the command prompt or in a Windows terminal window wsl -l -v you can get the list of Linux installations currently managed by WSL.
Using the command wsl -l -owithout going to the Microsoft Store, you can get the list of installable distributions on Windows. As we have already seen, with wsl --install -d followed by the name of the distribution, you can proceed with the installation.
Using the WSL configuration file .wslconfig, it is possible to deeply customize the operation of the subsystem and the behavior of the installed Linux distributions. In September 2023, Microsoft released WSL 2.0.0 with many important new features. We suggest following the instructions in the article to install the latest version of WSL.
How to apply WSL configuration changes
The interventions that apply to the contents of the file .wslconfig, are currently valid for all distributions managed by WSL. For them to be applied, you must stop the various running distributions and then restart them.
Per close all distributions upload from WSL in one go, just type wsl --shutdown at the command prompt.
Typing wsl --list --running you can possibly check the list of Linux distributions at the moment running with WSL.
Create the .wslconfig configuration file
Per configure WSL with particular reference to advanced settings, we suggest accessing the command prompt Windows then type the following:
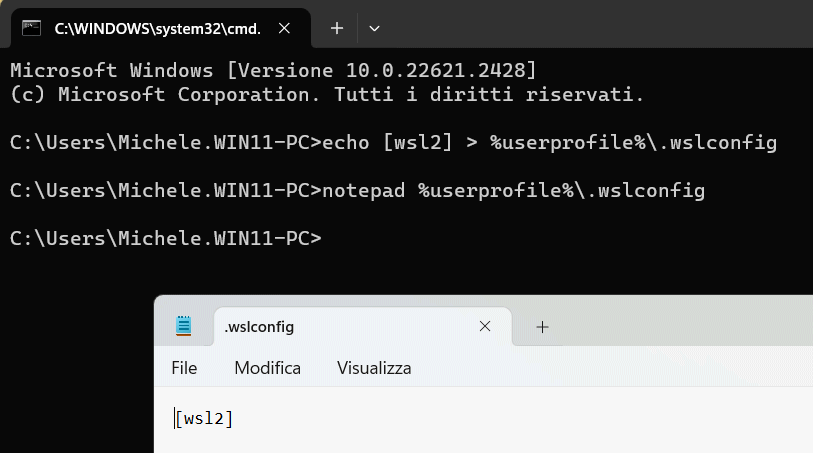
echo [wsl2] > %userprofile%\.wslconfig

notepad %userprofile%\.wslconfig
At page Advanced settings configuration in WSL contains all directives which can be set using the file .wslconfig. Some of them, like the ones Microsoft launched in September 2023, are still being considered experimental settings: they must therefore be used below the section labeled as [experimental].
If you have Visual Studio Code installed, to edit the file .wslconfig in an even simpler and more immediate way, just type:
code %userprofile%\.wslconfig
By pasting the following into the configuration file, you can benefit from a series of advantages introduced with WSL 2.0.0 and detailed in one of the articles presented previously:
[experimental]

autoMemoryReclaim=gradual

sparseVhd=true

networkingMode=mirrored

firewall=true

dnsTunneling=true
At this point, simply save the file by pressing CTRL+S in Notepad or Visual Studio Code.
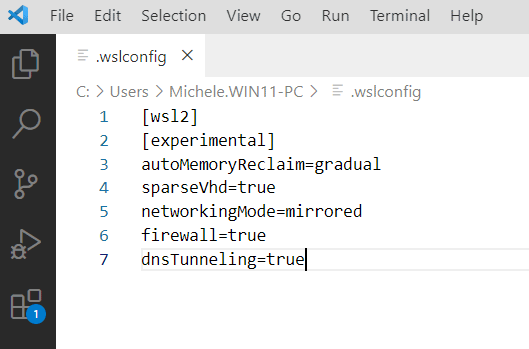
The various settings defined at the file level .wslconfig cause the WSL to progressively release (autoMemoryReclaim=gradual) the RAM memory occupied by Linux distributions when they remain unused or when there are no activities in progress; that virtual drives are automatically compressed to take up less disk space (sparseVhd=true), that WSL virtual machines access the same network interfaces configured in Windows (networkingMode=mirrored), that Windows firewall rules are automatically applied on Linux (firewall=true), that Linux virtual machines rely on the DNS servers configured in Windows for domain name resolution (dnsTunneling=true).
Linux WSL machines become an integral part of the local network
Thanks to the changes thus applied, the Linux machine shares the same local IP address of the host Windows system. Checking it is very simple: just type ipconfig at the command prompt on Windows e ifconfig in the WSL window: the IP address will be identical.

At this point, for example, if you install a Web server such as Nginx with the sudo apt command install nginx -ythe test page will be accessible from the host Windows system by typing 127.0.0.1 in the web browser or using theIP localeeven from devices connected to the LAN.
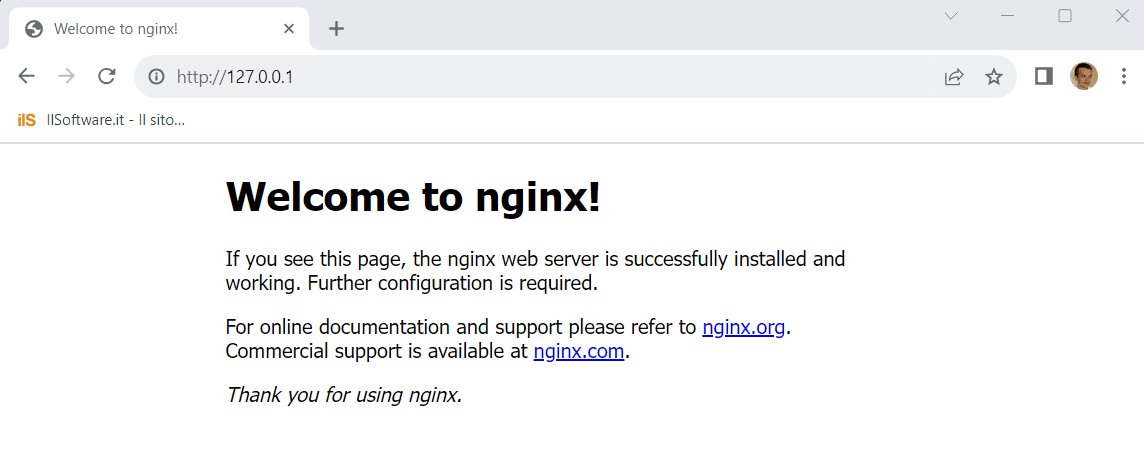
This feature changes everything because it allows you to test and install server components on Linux machines created with WSL and then have the possibility of accessing them from any local system. This is a really great feature for those who find themselves simulating the configuration of web servers, databases and applications that respond on various ports.
If something doesn’t work, check the connection rete Ethernet o WiFi on the Windows system running WSL it is set as a private network and not a public one. Otherwise, the Windows system will not even respond to ping requests sent by other devices on the local network (message display Request expired).
In another article we also saw how to import and export Linux machines in Windows with WSL.