READ ALSO -> Change Windows 10 audio and equalizer settings
Change audio output via volume icon
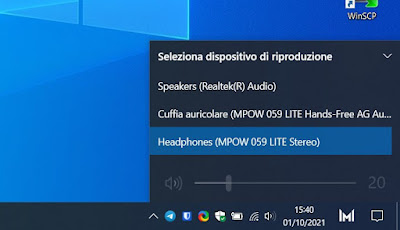
To quickly change the audio output of our computer, press the left mouse button on the Windows volume icon (bottom right), press the arrowhead icon and choose one of the devices in the list.
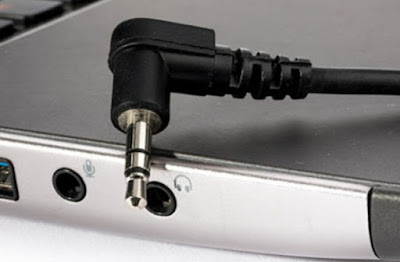
If we have connected headphones or earphones via a 3.5mm jack cable, we select the specific item for the analogue output of the PC (Headphone output, Analog output The AUX output). If we are using Bluetooth headphones we press directly on the Bluetooth name of the device, while if we are using a digital connection (HDMI, Optical audio output or DisplayPort) we press on Digital audio output, Optical audio output or similar items.
Change audio output via Settings
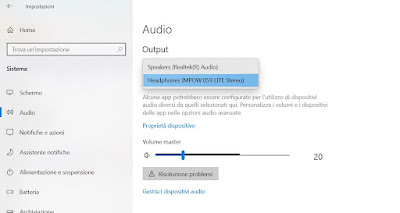
Another effective method to change the audio output on Windows is to open the Start menu, press on the app Settings and finally take us on the path System -> Audio.
We press on the drop-down menu under the section Output and select the headphones, earphones or audio output that we want to use for audio playback, whatever the type of connection used (audio cable, Bluetooth or digital cable).
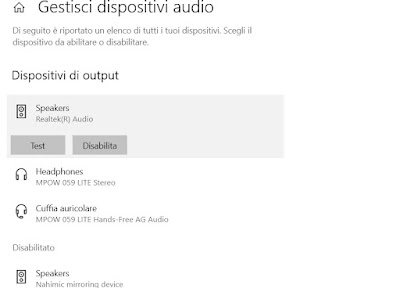
If after connecting a device we do not see its name appear in the output list of the screen Settings we press on the item Manage audio devices, press on the name of the audio output or of the deactivated device (in the section Output devices) and finally press the key Ability.
After enabling an audio output, we return to the previous screen, open the drop-down menu in the Output section and choose the audio output suitable for playing the sound or multimedia contents of the PC.
Change audio output via Control Panel
Although there are new methods to change the audio output, the Control Panel always allows you to change the settings related to the audio and, not to be underestimated, to set what should be the default playback device.
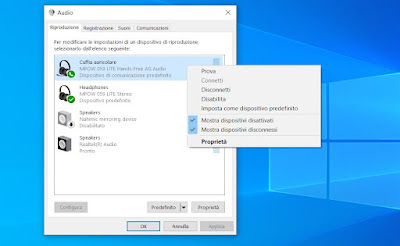
To use this method, right-click on the volume icon at the bottom right, click on the item Sounds and, in the window that will appear, let’s go to the tab Reproduction.
To enable a specific audio device, press the right button on it and check the item Set as default device. If we want to use a headset with a headset as a complete audio device for Skype, Zoom and other apps with audio and video, press the right button again on the headphones or earphones with a microphone and check the item Set as the default communication device.
What to do if the audio change does not work
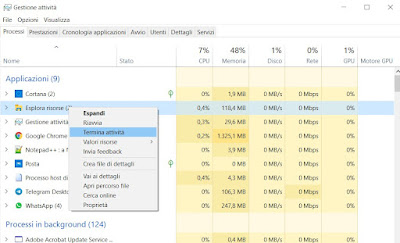
On computers with a few years on their shoulders it may happen that you can’t change the audio output, despite all the methods seen so far. If we can’t change the audio output we can try to restore the Windows interface by pressing the right button on the taskbar, opening the menu Activity managementby pressing on More details (if we hadn’t done this before) and, in the tab Processes, we identify the process Explorer, right click on it and select the item End activity.
The system interface will be closed and we can only use Activity management; to restart the interface, press at the top right on File, we press on Run new activity, we type explorer.exe and click OK. The interface should restart and the volume icon should work properly again.
If the audio change still does not work we advise you to update audio drivers, try another playback device, or if you are using a Bluetooth playback device, update the Bluetooth driver.
Conclusions
Compared to the past, changing the audio output on Windows is very simple, since Microsoft has decided to integrate a handy list of compatible devices directly into the volume icon. However, the methods for changing audio output from the menu remain valid Settings and from Control panel, for use in case of difficulty or if the device does not start up correctly.
If your PC is very old and the audio drivers are not available we can always try to update all drivers with an automatic tool, so as to find the latest version compatible with the sound card in his.
If, on the other hand, the audio device is not recognized by the system, it can be very useful to find out how identify an unknown device, so as to independently recover the right driver.

