The guide refers to the Windows 11 operating system but it can be easily reused with Windows 10 and earlier too, as the steps are very similar between all versions.
READ ALSO -> How to connect Windows PC to LAN
1) Make PCs visible on the network
The first step is to make the various PCs that make up our network visible to each other so that we can have a basis on which to start creating the home network.
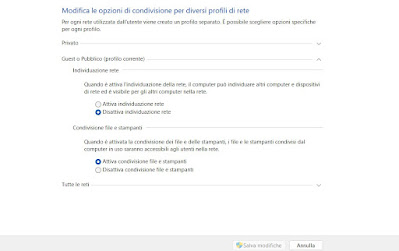
To proceed, turn on all the PCs with Windows on the network (connected both via Ethernet cable and via Wi-Fi to the home modem), open the Start menu at the bottom left, and type Advanced sharing taking care to select the homonymous Control Panel item that we will see appear at the top of the list.
A new window will open, in which we will have to select the right profile according to the network we are using.
For this guide let’s go into the profile Private and enable the items Enable network discovery, Enable automatic configuration of devices connected to the network and the voice Enable file and printer sharing.
On desktop computers we also open the profile All networks and enable the voice Enable sharing to allow all users with access to the network to read and write public folder files; if instead, we are configuring a handset it is better not to activate this item.
To confirm all changes, click on the entry below Save Changes.
READ ALSO: Share files and folders on the computer network on Windows PC
2) Move devices to the private network
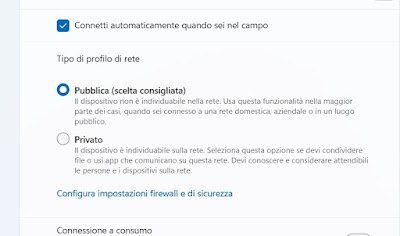
To get the best result, we will have to move the network to which we are connected on the PC in the profile Private, so as to make it visible to all other devices. To make this change, right-click on the network icon (in the lower right corner), open the entry Network and Internet settings (o Open connection and Internet settings), and click on the item Property (o Change connection properties).
In the window that we will see appear, make sure to select the button Private so as to move the network into the right profile.
On Windows 7 and Windows 8.1, we can get the same result by opening Explorer and taking us to the side menu Net; if we are on a network with profile Publica small yellow string will appear at the top of the window, just click on it to move the PC to the profile Private.
We repeat the steps on all the PCs in our possession, so as to make them ready for sharing; the PCs should already be visible by opening Windows Explorer and taking us to the side menu Net (section Computer).
3) Quickly share files on the network
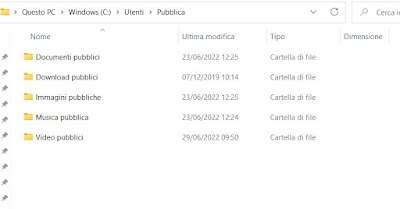
If we don’t want to waste too much time sharing files on the network, we suggest you take advantage of the public folders, that is the folders created by Windows for simple sharing within the same network; following this procedure the files will be immediately accessible on the network, without having to configure anything else.
To open the public folders we open File Explorer on our computer, we press at the top of the address bar, and type C:\Users\Publicso you can view public folders.
We copy within them the files that we want to share within the home network so that other PCs can access them without problems.
In recent versions of Windows, the Users are shared with special permissions: If the computers on the network use the same Microsoft account, they can view shared folders without problems and without having to enter a password.
This is a great advantage for all those who use multiple PCs where the account already used for sharing is present since the folders will be immediately accessible; things get complicated if in the home network there are different accounts (both local and Microsoft) for which we do not have the credentials.
In this specific case, it is advisable to create a specific account for the shares and make only public folders visible to everyone thus avoiding the sharing of private account credentials.
READ ALSO: Set up a private home network in Windows 10 and 11
4) Sharing with a secure public account
To create a secure public folder share accessible from any PC on the network (regardless of the account in use on the computers) we open the Start menu, look for Command Prompt press it with the right mouse button, and press Run as administrator. In the window that opens, type the following command:
net share
to view all active shares on your PC. For our purpose we will have to remove sharing a C:\Users and the folders inside it, using the command:
net share C:\Users /delete
We press on Y and on Enter to make the changes effective; if necessary we re-run the command to make the folder inaccessible as well C:\Users\Public (which we will configure with our parameters).
Create a user for shares
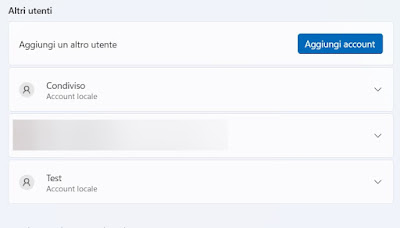
Now that we have removed every system share we immediately create a local account for the shares taking us to the app Settings pressing on the item Account by clicking on Family and other users and finally pressing on Add account present next to the item Add another user.
In the new window that opens, click on I don’t have this person’s login information click on Add a user without a Microsoft account let’s enter a name for the local account (okay Shared), choose a simple but strong password, fill in the security questions and press on Avanti to add the account.
Share secure public folders
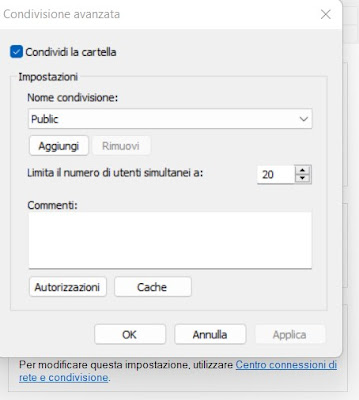
After creating this account we open File Explorer let’s take the path C:\Users\we press the right button on the folder Publish we press on Property let’s go to the card Sharing and press on Advanced sharing.
Inside the new window, we check the item Share the folder we press down on Authorizations and make sure it’s there Everyone is an authorized user; if this user is not present, we delete those present (selecting them one at a time and pressing Remove), click on add typing Everyone in the indicated field and pressing on Check names to avoid mistakes.
After finding the user Everyone we press OK to return to the previous window and check all the items under the column consented (i.e. the voices Complete control, Edit, Reading), so as to provide full access to public folders. If we are on a corporate network, it is better to leave alone Reading as permission for Everyone so that no one can add or modify the files in it.
Now that we have fixed the permissions, press OK and OK again to confirm the sharing of public folders.
Log in to public folders
The public folders will be visible on all Windows PCs connected to the network and configured on a private network (as seen at the beginning of the guide). To access it we open File Explorer or we open This PC on one of the other computers, go to the Network menu (on the left side), press on the name of the PC that created the public folders, and enter the access credentials of the shared account, using the name and password created in the chapter previous one.
For convenience, we can also check the item Remember credentials so you can access the folders in the future without having to re-enter your credentials.
By following this simple procedure we will have right away access to shared public folders without having to provide Microsoft credentials or the login credentials of the local account of the PC that provided the share: an extremely effective security measure in all scenarios where files and folders are shared over the network.
5) Share network printer
Do we want to print from all PCs without having to install the drivers required for printing on each of them? Do we have a USB printer connected to only one PC? In these cases, it can be very useful to share the printer on the network so that other PCs on the network can print without any problems.
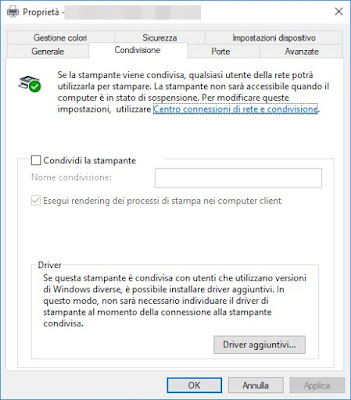
To share the printer on Windows we open the Start menu and type Printers and scanners, opening the menu item that will appear at the top. In the window that opens, select the printer already present on the PC (configured with the drivers, connected, and switched on) and click on the item Manage so that we can bring it to the menu Printer Properties – > Sharing.
We enable the check mark on the item Share the printer and give the printer a name, taking care to leave the item checked Render print jobs on client computers.
If we have various versions of Windows on the various PCs on the network, click on Additional drivers to be able to install all the drivers needed for printing.
After sharing the printer on the network, simply take us to the other PCs, open File Explorer o This PC go to the menu Net, and click on the printer displayed as shared (alternatively, click on the name of the PC where the printer is located and click on it).
READ ALSO: Configure a network printer shared between PCs
Conclusions
Creating a good home network were to share files is all in all very simple, but we will have to follow very specific steps to get the maximum result with the minimum effort. To create the home network, we move all the computers in our possession to the private network, we modify the advanced sharing settings, if necessary we create a user for the shares, we share the public folders and save the files inside them to be made accessible to all the others. computer on the network.
To learn more we can read our guides on how to manage shared folder permissions in Windows and how to connect PCs remotely and control them via VPN.

