Even if you don’t have a limited Internet plan, these methods are useful. Also, it’s time for you to notice that your Windows 10 PC consumes too much data than usual. Hence, to use your Internet plan judiciously, you should also reduce the data usage of your Windows 10 computer by using the tips listed below.
READ ALSO: How to navigate on PC using as little data traffic as possible
1) Activate the connection on consumption
The first option to be activated to save data traffic is that of the connection on consumption. This tells the computer to pause some background activity, such as automatic download of Windows updates, automatic app updates, automatic updates of dynamic icons in the Start menu and some other functions that use the internet connection.
We have already seen the guide on how to use the consumer connection in Windows 10, when and why.
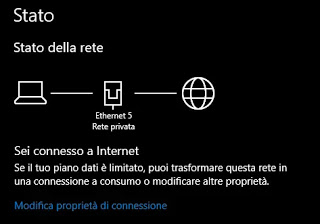
Open the menu Settings Windows, go to Network and Internet, in State, press on Change connection properties and turn on the switch Set as connection on consumption.
2) Set the data limit
Those who connect via the Internet plan with limited Giga, can set this limit in the Windows 10 settings so as to be warned when you are close to exceeding the threshold. For example, if internet data traffic is limited to 20 GB per month, you can make your PC use no more than 20 GB per month. Before setting the data limit, you must have activated the consumption connection as seen in point 1.
To set the internet data limit in Windows 10, open Settings, then go up Network and internet, then, in the left section, tap on Consumption of data. On the right you can press the button Set threshold. Pay attention to that row Show settings for the internet connection used is selected (for which you want to reduce the use of data). At this point choose the type of limit and the reset date of the threshold.
3) Limit data consumption in the background
By default, the Windows 10 system is designed to use your internet connection to automatically install and update apps from the Windows Store. If left free, these background app updates could consume a large chunk of the (limited) Internet plan. Therefore you need to disable these updates.
Go to Settings Windows 10, then press on Network and Internet, then up, on the left, up Consumption of data.
Scroll down the screen on the right and below Background data, to select Always to limit background activities of Windows Store apps.
Alternatively, if an active data limit is set on your computer, you can limit the use of background data when you reach 10% of the data limit.
4) Disable background apps
The Windows 10 operating system allows some apps to run in the background, even when the apps are closed and not used. Some of these apps not only consume Internet traffic silently, but also reduce the PC battery faster than usual. If you want to limit the use of Windows PC data to the bare minimum, you can disable all or most of the apps in the background.
We have already written the guide on how to disable background apps in Windows 10: open them Settings, go to the section Privacy, scroll down the left section and press up Background apps.
Now you can turn off the background apps switch to turn them all off together or choose which ones to turn off and which to keep active in the list below.
5) Disable synchronization of settings
If you log in using a Microsoft account, Windows 10 settings are synchronized online in the cloud so that they can be shared with any other PCs. This is a great feature, but it consumes internet traffic.
To disable this function and activate it only when necessary, open Settings Windows 10, go to the section Account then on Sync your settings on the menu on the left. Here disable the option Sync settings.
6) Turn off automatic updates of Windows 10 apps
On each Windows 10 PC, the default apps manually installed from the Microsoft Store are set to be updated automatically as soon as a new version is available. Automatic app updates consume Internet data and can be disabled as seen in point 1, via the consumption connection. To reinforce this interruption, you can disable automatic updates in the Microsoft Store.
To do this, open the Microsoft Store from the Windows 10 Start menu and then press the three-dot menu icon in the upper right corner to find the Settings. In the Store Settings, disable the option Update apps automatically.
7) Pause Windows 10 updates
Windows updates are important, but they download a lot of gigabytes of data. To pause them when using a limited data connection, you can set the connection on consumption as seen in point 1 and also change an update option. Then open the Settings Windows 10, go to the section Updates and security and then on Advanced options under Windows Update. In the section Pause updates, press on the menu to select the date on which you want to postpone the automatic download and installation of Windows 10 updates.
As seen in another article, there are also other ways to block Windows 10 updates and disable Windows Update.
READ ALSO: Limit the internet traffic of processes and the network bandwidth for programs
