
Package manager on Windows? Until some time ago we would have had great difficulty finding a single application capable of providing behavior remotely comparable to the package managers usually used in the GNU/Linux context. Yet today even Windows users can benefit from the services of software tools designed for automate le procedure d’installation of a wide range of more or less commonly used programs.
What is a package manager
A package manager is software designed to simplify the process of installing, updating, configuring, and removing software on a system. This tool takes care of management software packagessets of files needed to make each program work.
In the article where we explain how to create Linux servers, we saw the main differences between package managers such as APT, Yum, dnf (Dandified Yum), Pacman and so on. These are names used in the main distributions of the “penguin”.
However, for some years there have also been package managers for Windows, i.e. special utilities that simplify the program downloadsthey manage the addictions and allow users to install an application without having to use a web browser and manually download all the necessary software components.
The best package managers for Windows also make it easy updates and removal of the software, ensuring more efficient management of the system.
What is Scoop and what is it for
For those who want to quickly install and effectively manage Windows applications, Scoop is a real godsend. First of all, it is free, open source software distributed under a permissive license.
Some define it as a package manager but Scoop, as the project administrators themselves make clear, rather wants to be a installer. The question is a bit of a mess: we will try to summarize the most important points below, making a comparison with Winget e Chocolatey.
Scoop’s usefulness lies in its ease of use and centralized management of packages. It also allows you to easily keep track of software versions installed, making it easier to update.
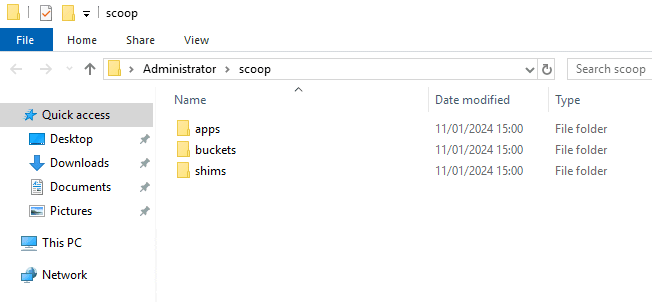
Unlike other similar solutions, Scoop centralizes all the software downloaded and executable on the Windows machine within the folder corresponding to theuser accounts in use. Once installation is complete, just press Windows+R then type %userprofile%\scoop in the field You open: you will find yourself faced with a structure, in terms of folders, similar to the one shown in the figure.
By default, unless the user provides different instructions at installation, Scoop installs right into the folder %userprofile%\scoop. But in this same folder that the application stores all downloaded programs gradually on the local system.
Scoop subfolders: what are they for?
In Scoop, the apps, buckets, and shims folders play specific roles in the package management process:
apps: Contains all applications or installed packages via Scoop. Each package is organized in its own specific subfolder within apps. The files associated with the application such as executables, scripts, components, libraries and data necessary for the operation of each individual program are stored here. Think for example about DLL libraries: some of them are common to multiple programs but Scoop stores an instance of them for each managed application. Of course, it’s a somewhat redundant approach but Scoop thus solves any problems compatibility and makes all the apps taken under its wing portable.buckets: Scoop saves recipe collections in this folder (recipe) that define how to install packages specific. A recipe contains information on how to download, install, and configure a package.shims: By installing an application via Scoop, the shims created allow the program to be executed from the command line without having to specify the complete route. I file shim lightweight executables which act as intermediaries between the command prompt and the actual application executable. They allow you to launch programs more easily, without having to worry about the correct path to each executable.
How to install Scoop in Windows
L’Scoop installation it’s very simple: just open a PowerShell window of the operating system and then issue the following two commands:
Set-ExecutionPolicy -ExecutionPolicy RemoteSigned -Scope CurrentUser

Invoke-RestMethod -Uri https://get.scoop.sh | Invoke-Expression
The first command sets the execution policy of the script PowerShell for the current user. Specifically, it enables the execution of signed local PowerShell scripts and remote scripts downloaded from trusted sources. The second command downloads the published and updated script at get.scoop.sh then immediately runs it on the system. It is about theinstaller PowerShell for Scoop.
Have you noticed an important aspect? We didn’t say to open the PowerShell window with administrator rights. Indeed, if this is done, Scoop warns the user and refers him to reading this support document. Scoop advises against it use administrative accounts and privileges for security reasons. All applications are collected within the user profile current, thus using the most limited privileges.
For those who still want to install Scoop from a PowerShell window opened with administrative rights, just use the following command: iex "& {$(irm get.scoop.sh)} -RunAsAdmin"
Use Scoop to install and manage Windows programs
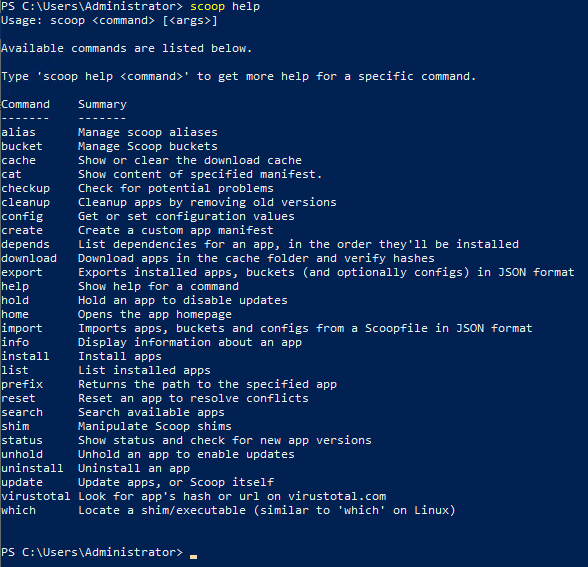
After completing the Scoop installation, you can type scoop helpregardless of the folder you are in, to get the command list usable.
One of the most useful commands is certainly the one that allows you to search for the program to install. Just type scoop search followed by a keyword to check if it was supported by Scoop and check which bucket, if any, it is in.
And bucket it’s sort of repository, an archive containing a more or less large selection of software of various kinds. You can also search the buckets from the project home page by writing in the box Search an app. Using the web application or command scoop searchyou can easily know the name of the bucket containing the requested program.
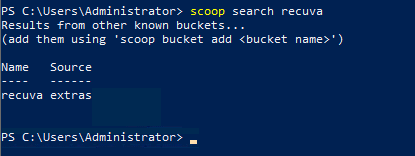
In the example in the figure, the bucket name is, in this case, extras and is shown just below the column Source. The official buckets are the top 10 and are highlighted with a blue tick to the right of their name. By clicking on a bucket, you can also “browse” its contents from the Web.
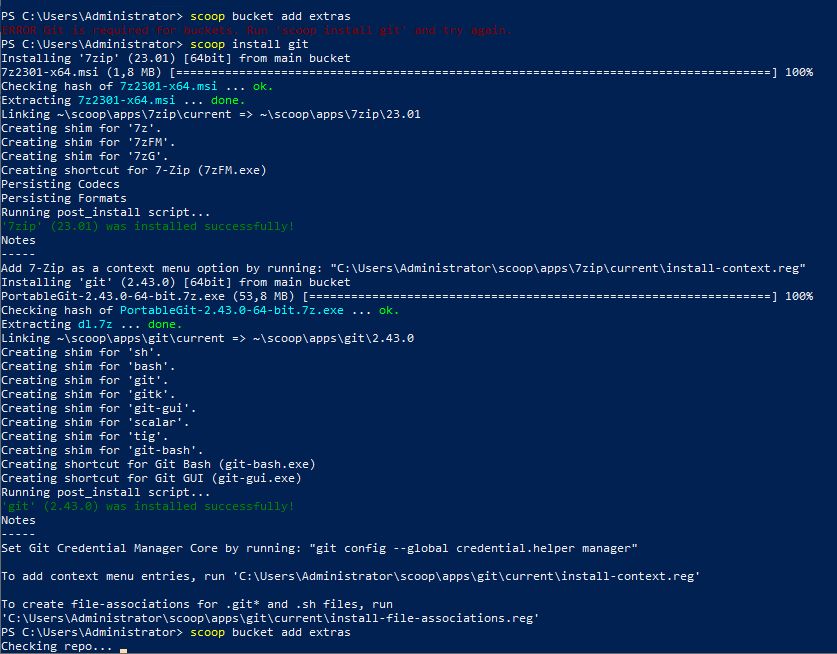
To add a bucket, for example the aforementioned extras, you must first install the Git software (scoop install git) then issue the following command:
scoop bucket add extras
Install a software package
At this point most of the work is done. For install software with Scoop, you simply type the command scoop install followed by the name of the package detected with the command scoop search seen previously. The program thus installed will be available both from the command line (startable from any folder) as well as in the Windows Start menu.
In case something doesn’t go right, you can use the command scoop checkup to check the indicated program (it must be explicitly specified) and obtain practical suggestions to unblock its functioning.
In some situations, Scoop may suggest installing the utility sudo. Anyone who uses Linux systems knows that sudo is a command that allows a user to run programs with i security privileges of another user, usually the root user or another specified user. The term “sudo” is an abbreviation of “superuser do“.
In Windows, obviously, there is no sudo command but Scoop uses a version specifically created for Windows in order to execute specific commands with administrator rights, if and only if this is really necessary. Scoop, in fact, does not even display UAC (User Account Control) requests precisely because the intent is to limit the rights that can be exploited by running programs as much as possible. The sudo command can be installed as needed using scoop install sudo.
Get the list of installed programs with Scoop and update them automatically
…