How to set a network as “Private” in Windows 10 and Windows 11, and what to do if you are unable to change the network to Public
 When we connect to a new network with Windows 11 or Windows 10 it is named and the user is asked to specify what type of network it ischoosing between home or public network.
The difference essential is that private networks (home or business) allow you to use the sharing of resources, folders, printer while the public is the one used when you connect to the wifi of the bar or station, to keep the PC separate and isolated from other connected devices.
In most cases the connection will be set up as a home network, but if we have set the public network by mistake we have two options: leave everything as it is (especially if we are connected to a public network or one whose owner we do not know) or change the network type setting from the Windows settings.
In the following guide we will show you how to change public network in windowsillustrating the steps to follow on Windows 11 and on Windows 10 using both simple methods and methods dedicated to professionals.
READ ALSO: Set your home network private and all others public
1) Set up private network on Windows 11
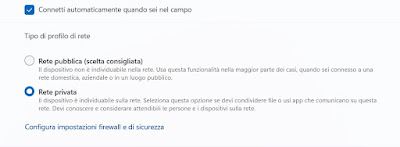
If we use a Ethernet cable connection we can change the public network by pressing WIN+I on the keyboard, opening the menu Network and the Internetby selecting the menu Ethernet and selecting Private network on the screen that will open.
2) Set up private network on Windows 10
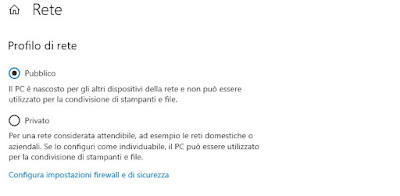
On older versions of Windows 10 (which we recommend update as soon as possible) we can change the network settings by pressing WIN+I on the keyboard, selecting the item Network and the Internetby clicking on the name of the network to which we are connected and activating the switch next to the entry Make this PC discoverable (which will make the network private).
3) Change network from PowerShell
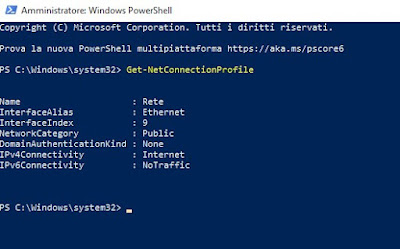
To proceed, right click on the Start menu, press on Terminal (Admin) about are Windows PowerShell (Amministratore) and type the following command:
Get-NetConnectionProfile
to find out which network profile we are using at that moment; next to the entry NetworkCategory we will find Public o Private according to the active settings.
In the information that we will get we check the interface number assigned under the heading Interface Index (for example 3) and type the following command to switch from public to private network:
Set-NetConnectionProfile -InterfaceIndex 3 -NetworkCategory Private
We change the number 3 according to the number assigned to the active connection at that moment; the same command can also be customized to switch between private and public networks:
Set-NetConnectionProfile -InterfaceIndex 3 -NetworkCategory Public
If we want instead make all networks private just run the following command:
Get-NetConnectionProfile | Set-NetConnectionProfile -NetworkCategory Private
The same command can be customized to get all public networks:
Get-NetConnectionProfile | Set-NetConnectionProfile -NetworkCategory Public
For more information, you can read our guide on differences between Powershell and Windows Command Prompt.
4) Change public network from the registry
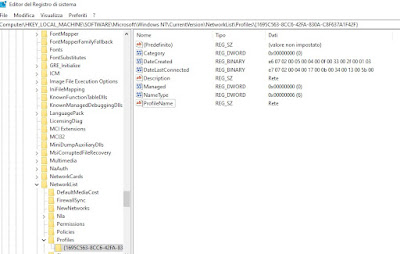
Anyone who wants to use this method just has to open the Start menu, type regeditopen the app Registry editor and go to the following path:
HKEY_LOCAL_MACHINE\SOFTWARE\Microsoft\Windows NT\CurrentVersion\NetworkList\Profiles
In this folder we will have various sub-folders with random nameswhere each sub-folder is both a network to which we have already connected in the past and the network cards present on our PC.
To proceed, select the network card we are using at that precise moment (helping us with the name on the item ProfileName) and, after having identified the right sub-folder, double click on the item Category and, under the field Value datawe set the correct number to change network type:
- 0: public network
- 1: private network
After entering the right number, press on OKclose the editor window and restart the PC for the changes to take effect.
On the registry editor we recommend that you also read our guide on how to backup the registry and avoid errors.
5) Reset all network settings
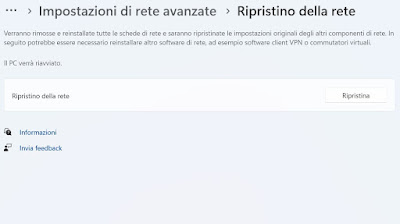
On Windows 10 we can do the same by going to the path Settings -> Network & Internetby clicking on the item immediately Network reset at the bottom of the page and restart the computer.
Conclusions
There are various methods that we can use to change public network on windowseven if we have accidentally set the wrong network type; when we are connected to the home network it is always advisable to set a private network so that all other devices on the network can see the PC and access the shared folders.
Different story if we access a Wi-Fi hotspot or a network where we are guests: in this case, for greater security, we always set the public network, so as to secure the PC from snoopers and hackers.
To learn more we can read our guides on how to turn on network discovery in windows 10 and 11 and about how fix connection problems between PC and file sharing.
