 If we need to share a printer so that it can be used by all PCs on the LAN, we will have to connect it so that it can be “seen” by all the devices, using the modem or router present on the network (also wireless), sharing the printer from a Windows PC or entrusting ourselves to Google Cloud Print, the via print service Internet signed Google and suitable for a multitude of printers.
In this guide we will show you all the steps to follow for configuring a shared network printer between PCs, so you can choose the best one for the office, for the business network and for the home network.
The only prerequisite is that the printer has an Ethernet port or a Wi-Fi module so that it can be quickly added to the devices shown below.READ ALSO: Share the printer and print from anywhere
Configure a shared network printer between PCs
With modern printers we have different ways to set up a network share, it’s up to us to choose the one that best suits our needs.
Direct connection to the modem/router
The simplest and most immediate way to add a shared network printer is to connect it directly from the modem or router via Ethernet cable, so as to show itself as a network printer.
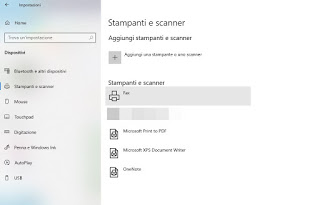
Once connected simply turn it on, wait a few seconds then open the PC with Windows 10 and proceed with the addition of the printer, this operation can be done by opening the Start menu at the bottom left, looking for and opening the app Settings, selecting the menu Devices, by pressing on the menu Printers and scanners and finally pressing the button Add a printer or scanner.
The search for the new printer will start, which we can integrate into the system by pressing the button to add (the driver will be searched automatically by Windows).
On Windows 7 and Windows 8.1, we can add the printer by opening the Control panel, by clicking on Hardware and sound, by pressing on Devices and printers and finally clicking on the button Add printer.
Self our printer is equipped with a Wi-Fi module, the steps to follow on Windows are identical, only the connection method changes: we will have to access the wireless settings of the printer, start the search for networks, select the right Wi-Fi network and enter the login password.
Some printers also have a button for fast Wifi WPS connection, which allows you to quickly connect the printer to the modem or router without having to manually enter the password (which is very useful on printers without a monitor or with a monitor with reduced information).
Network sharing from a Windows PC
Another method to share the printer involves adding it to a single Windows PC and then sharing it as a network printer so that all other computers or devices can see it. This method is recommended for USB printers and printers that we want to use only when the administrator PC is on.
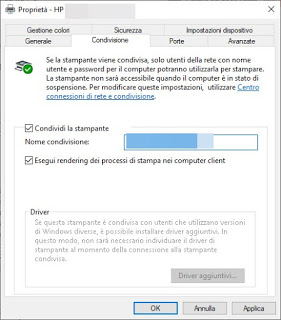
First we add the printer to Windows as seen in the previous chapter or using the installation disk to add the driver (in particular on USB printers or with a few years on their shoulders); done that let us go in Control Panel -> Hardware and Sound -> Devices and Printers (available on all supported Windows), we right-click on the printer name, select the item Printer properties, let us take the tab Sharing and put the checkmark next to the item Share the printer.
In the head Share name, we choose a name that is easy to remember, we put the checkmark on Render print jobs on client computers and finally we press down on apply is OK.
Now the printer is shared on the same network as our Windows computer; to deepen the subject we refer you to the reading of our guide to sharing files and printers on the network between Windows computers.
Connect to Google Cloud Print
Another very effective way to quickly share a printer on the network is to use Google Cloud Print, the webserver provided by Google and quickly configurable on any computer.
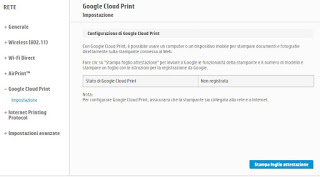
If our printer is compatible with Google Cloud Print, all we have to do is access his control panel (usually enough enter the printer IP in the browser address bar), open the menu Google Cloud Print and press the button Print attestation sheet.
A sheet will be printed with a custom link; within 15 minutes we will have to connect to the link provided (possibly from Google Chrome with our configured Google account), so as to start the recognition of the printer and the automatic association with our Google account.
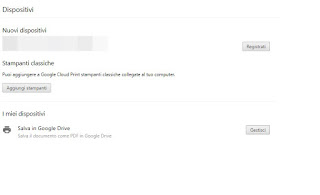
If the printer does not provide direct support for Google’s cloud, we can try adding it by opening Google Chrome, type in the address bar chrome: // devices and pressing the button Add printers.
Select the printer to be added from the list of devices and click on the button below Add printers; back in the previous screen, press the button Sign in next to the printer name to add it to Google Cloud Print.
To learn more about the cloud printing offered by Google, we invite you to read our guide to share a printer with Google Cloud Print on Windows.
How to view the shared network printer on other PCs
Once the printer is connected to the network using one of the methods described above, we need to add the shared printer to all the computers and devices that need their services.
In the case of the shared printer on the network directly or through Windows sharing, we open the Control panel, let’s get in Devices and printers and press the top button on the Add printer. Windows performs a quick network scan for detectable devices not yet installed on the PC and displays them in the window Add a device. If we see the printer just click on it to install it.
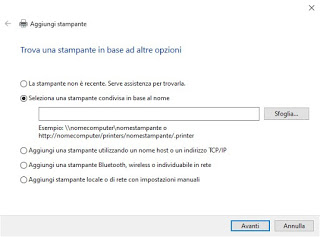
If we do not see the printer we click on the bottom-up The desired printer is not listed, we put the checkmark on the item Select a shared printer by name, enter the name of the shared printer then press on Come on to add it.
Alternatively, we can tick the item Add a printer using a hostname or a TCP / IP address and enter the IP address of the printer.
In the case of shared printer via Google Cloud Print, it all depends on the use of the printer: if the network is private and we only use our Google account, just install Google Chrome on all our PCs and access them; if the printer is shared in the office with others, simply open the Google Cloud Print web page, click on the printer, click on Share and, in the box displayed, enter the Gmail addresses or Google accounts with which to share the printer. Now it is sufficient that Google Chrome is present on the other stations with the respective accounts enabled to access the printer.
To allow a person to change the name of your printer or share access, simply change the “Can Print” privilege with “Management Privileges”.
Conclusions
Configuring a shared network printer between PCs does not require too many steps and should be within reach of anyone who chews a little with networks and Windows settings. For personal networks, we can use both Google Cloud Print and direct sharing, while on a corporate network we recommend authorizing individual Google accounts for cloud printing or sharing the printer directly from the administrator computer, so as to have a greater form of control.
In case of problems with the printers, we refer you to the guide to connect the Wifi printer and solve wireless connection problems.
If we have problems with the printer driver, we advise you to read our article on install the printer driver and print management program.

