 Windows Defender is the name of the Windows 10 antivirus included in the system. It is very strong protection for Windows 10, which is activated immediately after installing the system to prevent the PC from remaining vulnerable and exposed to viruses and malware ready to strike immediately as soon as the internet is opened. Although it is a viable antimalware solution, sufficient for most users, there are some special situations where you would prefer to disable it. For example, if you install Windows 10 on a PC that does not connect to the internet or to install alternative antivirus or even to perform activities blocked by the antivirus.
The only problem is that there is no option for uninstalling or remove Windows Defender Antivirus permanently since it is an internal feature and deeply integrated into the Windows 10 system disable the antivirus with some alternative procedures, disabling real-time protection or using Group Policy or the registry.
READ ALSO: Antivirus Windows 10: better to install one or just Windows Defender?
In this Windows 10 guide, we see the steps to disable Windows Defender Antivirus permanently (or even temporarily) on the PC, in three ways:
- Disable Windows Defender Antivirus from the Security Settings
- Disable Windows Defender Antivirus by using Group Policy
- Disable Windows Defender Antivirus by using the registry
Disable Windows Defender from Windows Security Settings
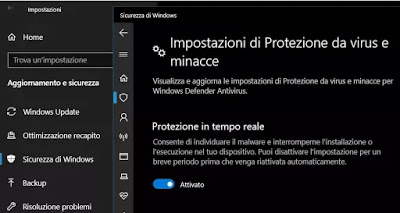
For disable real-time antivirus monitoring of Windows 10 you can open the Start menu, go to Settings> Update and security and click on Windows security. Then press on Protection against viruses and threats to open the Windows security control center. Then click the link Manage settings under Virus and threat protection settings.
From this screen, it is now possible to disable the option of Real-time protection, but as can be read in the three lines above the switch, this deactivation will only be temporary. Windows 10 will, in fact, reactivate its antivirus automatically if it detects that it has been deactivated for some time. Although this is not a permanent solution, the procedure to follow in order to disable the Windows 10 antivirus in order to perform specific tasks or use a particular software that would otherwise be blocked remains.
READ ALSO: Windows 10 Security Settings Guide
Disable Windows Defender from Group Policy
In Windows 10 Pro and Windows 10 Enterprise it’s possible remove Windows Defender protection permanently by opening the Group Policy editor.
To open the group policy editor, press the Windows-R keys together and then execute the command gpedit.msc. From the folders on the right side open: Computer Configuration> Administrative Templates> Windows Components> Windows Defender Antivirus. On the right side, find the option Disable Windows Defender Antivirus, click on it twice and change from Not configured to enable. to press apply and restart.
After completing the steps, the Defender antivirus for Windows 10 will be permanently disabled on your computer. You will still see the shield icon in the notification area because it is the Windows Security app icon and not specific to the antivirus.
If you change your mind, you can always reactivate Windows Defender by following the same instructions, setting the option as not configured Disable Windows Defender Antivirus.
This type of solution, however, it does not exist in Windows 10 Home, considered by Microsoft as the operating system for non-professional users who should not need to disable the antivirus.
Disable Windows Defender using the registry
If you don’t have access to the Local Group Policy Editor or if you use Windows 10 Home, you can still disable Windows Defender permanently by modifying a key in the registry .
Then open the Start menu and search for the word regedit to open the registry key editor.
In the search bar at the top, copy the following path and press Submit:
HKEY_LOCAL_MACHINE SOFTWARE Policies Windows Defender
Right-click on the Windows Defender key (folder), select New> DWORD value (32 bit) and create a new named key DisableAntiSpyware. Click on it twice and change the value from 0 to 1. Press OK, close the editor and restart the computer. Windows Defender will now be completely disabled.
To cancel this change, go back to the Registry Editor and delete the DisableAntiSpyware key, right-clicking on it.
Conclusion
Beyond the different methods that you can use to disable Windows Defender Antivirus on Windows 10, I want to say that it is not advisable to do so and remain without anti-malware. It is also important to note that if you install another antivirus, it is not necessary to manually deactivate Windows Defender Antivirus, since will be disabled automatically during the installation process.
I remember, in another article, I Best Free Alternative Antivirus to Windows Defender for Windows 10.
Finally, I remember that in Windows 7 Windows Defender exists, but it is only the name of the anti-malware scanning service, without real-time protection.
As seen in the past, you can disable Windows Defender in Windows 7 even if there is no reason to do so.
READ ALSO: How to use the “Windows Defender” antivirus
