 Have we tried an iPhone for the first time and are we determined to switch to the smartphone produced by Apple after many years spent with an Android phone (Samsung, Huawei, Xiaomi or others)? In this case one of the first problems to be solved is the passage of all the numbers in the phone book, so you can contact our phone numbers (stored on the Android phone) even on the new iPhone, without having to request all the numbers to those directly concerned! In this guide, we have collected all the fast and practical methods (therefore within reach of all users, even those who are beginners with iPhone) for transfer phonebook numbers from an Android smartphone to an iPhone, without using PC programs, management suites or difficult wizards.
At the end, we will be able to contact all our numbers in the phone book and open chats on messaging apps that support access to the address book (we will immediately display the names of our friends and relatives).
How to transfer the phonebook from Android to iPhone
The methods that we will illustrate here involve the use of the Google account (already present on our Android smartphone), the CardDAV service and the use of the SIM Card, a traditional but always very effective method.
Transfer contacts via Google account
The simplest and best way to transfer contacts from an Android phone to the iPhone is to take advantage of the Google account already present on the starting smartphone.
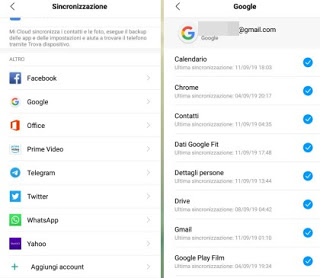
Let’s open the app Settings on our Android smartphone, let’s get to the section Account and synchronization (or similar names), we check the presence of our Google account, so let’s tap on it to open the synchronization settings window.
From the new screen, make sure it is ticked on the item Contacts, so as to synchronize all the phonebook numbers in the Google account.
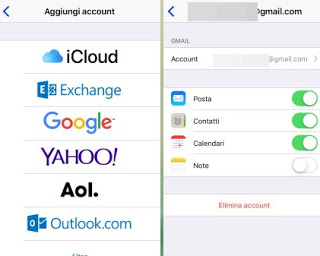
Once this check is done, we open the app Settings on the iPhone (possibly connected to the Internet), let’s get into the menu Password and account so let’s tap on Add account.
On the screen, we press the Google icon, then enter the login credentials to start account synchronization.
To be able to import all the contacts synchronized on the account, let’s tap on it once added and make sure that the entry is activated Contacts, so as to quickly transfer all the numbers saved on the Android smartphone into the iPhone address book.
To learn more, we invite you to read our guide on the Management of contacts in Google, where we can find other useful information on how to use the synchronization services offered by the Mountain View company.
Transfer contacts via CardDAV
If we have phone numbers saved in the Gmail email account or we want to use another method to transfer Transfer contacts and numbers from Android to iPhone, we can use the account CardDAV to transfer all contacts.
Let’s make sure that the contacts of the Android smartphone are synchronized with the Google account (as seen in the previous chapter), then we open any web browser to see all the phone numbers synchronized online, on the Google Contacts page.
Having checked this, we open the app Settings on the iPhone, let’s get back on the path Password and account -> Add account, this time we choose the item Other and select finally Add CardDAV account.
On the screen, we indicate as server Google. com, we enter the username and password of the Google account or of the Gmail account, we insert description as we like, we press at the top right on Next and make sure that the option Contacts is selected.
The iPhone address book will be filled with all the contacts in the Google address book, including Android phone numbers and email addresses saved in Gmail.
If we also have an Outlook account and want to sync it quickly, we recommend reading our article on how to Synchronize the address book between Gmail and Outlook and import the contacts, so that you can also bring your Outlook contacts to Gmail and transfer them to iPhone, thus creating a single centralized address book.
Transfer contacts via SIM Card
This is the classic method, used since the dawn of mobile phones but still valid on modern smartphones.
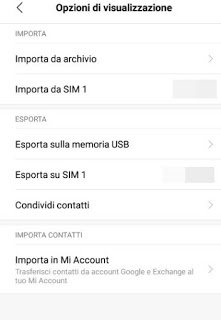
From the Android phone, we open the app Contacts or Address Book, let’s get into the options of the same (top right) and start the item Import / Export (or similar names).
Now we will only have to select the item Export to SIM to transfer all the contacts on the SIM card chip; if we have an Android Dual SIM smartphone, make sure we select the correct SIM, that is the one we’re going to use on the iPhone.
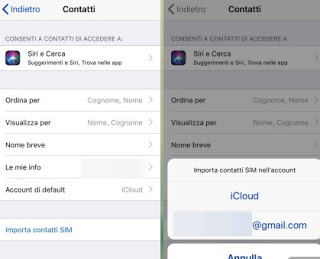
At the end of the transfer we turn off the Android smartphone, remove the SIM containing all the numbers, insert it inside the iPhone, turn on the latter, take it on the way Settings -> Contacts and let’s finally tap on the item Import SIM contacts.
A small window will open in which to choose whether to import the SIM contacts on our iCloud account or on another account on our iPhone (for example Google).
If the old SIM of the Android smartphone is too large for the iPhone, we can contact our operator for a replacement or proceed with the cutting, as indicated in our guide on how to Change or cut the SIM-card for iPhone and as a Micro-SIM.
Conclusions
If we have decided to take the “big step” towards an iPhone, it is advisable not to be caught unprepared, immediately bringing all our contacts saved in the address book of the old Android smartphone.
In another guide, we have seen how to Recover phonebook and contacts on Android iPhone and Samsung phones, so as to be able to transfer the contacts on the iPhone starting from the Samsung branded mobile phones. Do we also want to transfer media files from the Android smartphone to the iPhone? We recommend using one of the apps seen in the guide App to send files on Android and iPhone so that we can send all the photos, images, videos and documents without going through the PC.
If we do not know what to do with the old Android smartphone, in our guide to different ways to use the old Android phone we will find many interesting ideas to immediately reuse the phone.

